Level 5 · Master
Kokiris rule sets, RuleForge assistant, revisions, cluster, performance, SSL certificates, AI assistant, accounts, resellers and members, API keys and API page.
5.1 The Kokiris protections
- Read the list of covered vulnerabilities.
- Enable the rule set of your CMS on a site.
- Declare the back-office path of a PrestaShop or Magento shop.
Kokiris publishes rule sets that fix recent vulnerabilities within a few hours, before the site is updated. The Kokiris Rules set applies to all sites. You choose the CMS sets site by site: Kokiris WordPress, Kokiris PrestaShop, Kokiris Magento and Kokiris Joomla.
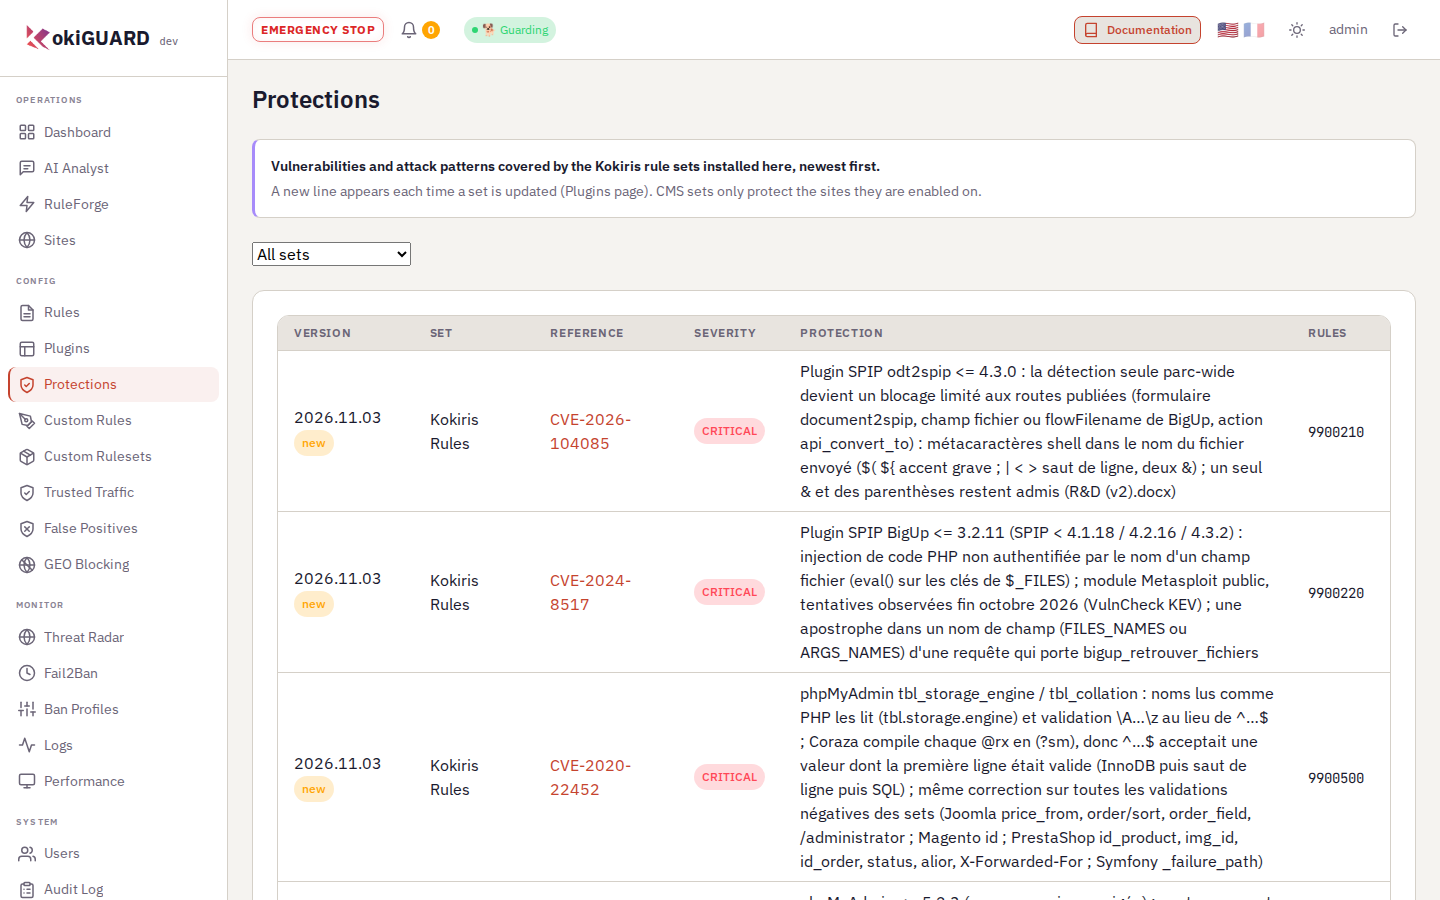
Protections. Each line is a covered vulnerability, with its CVE reference and the rules that block it. The bell at the top counts the new ones.
- Open the site page, Enabled Plugins card.
- Tick the set of your CMS, for example Kokiris WordPress for the WordPress site.
- For Kokiris PrestaShop or Kokiris Magento, also fill in the Back-office path in the General card: the
/admin…folder renamed when PrestaShop was installed, or the frontName of the Magento administration. - Save, then apply.
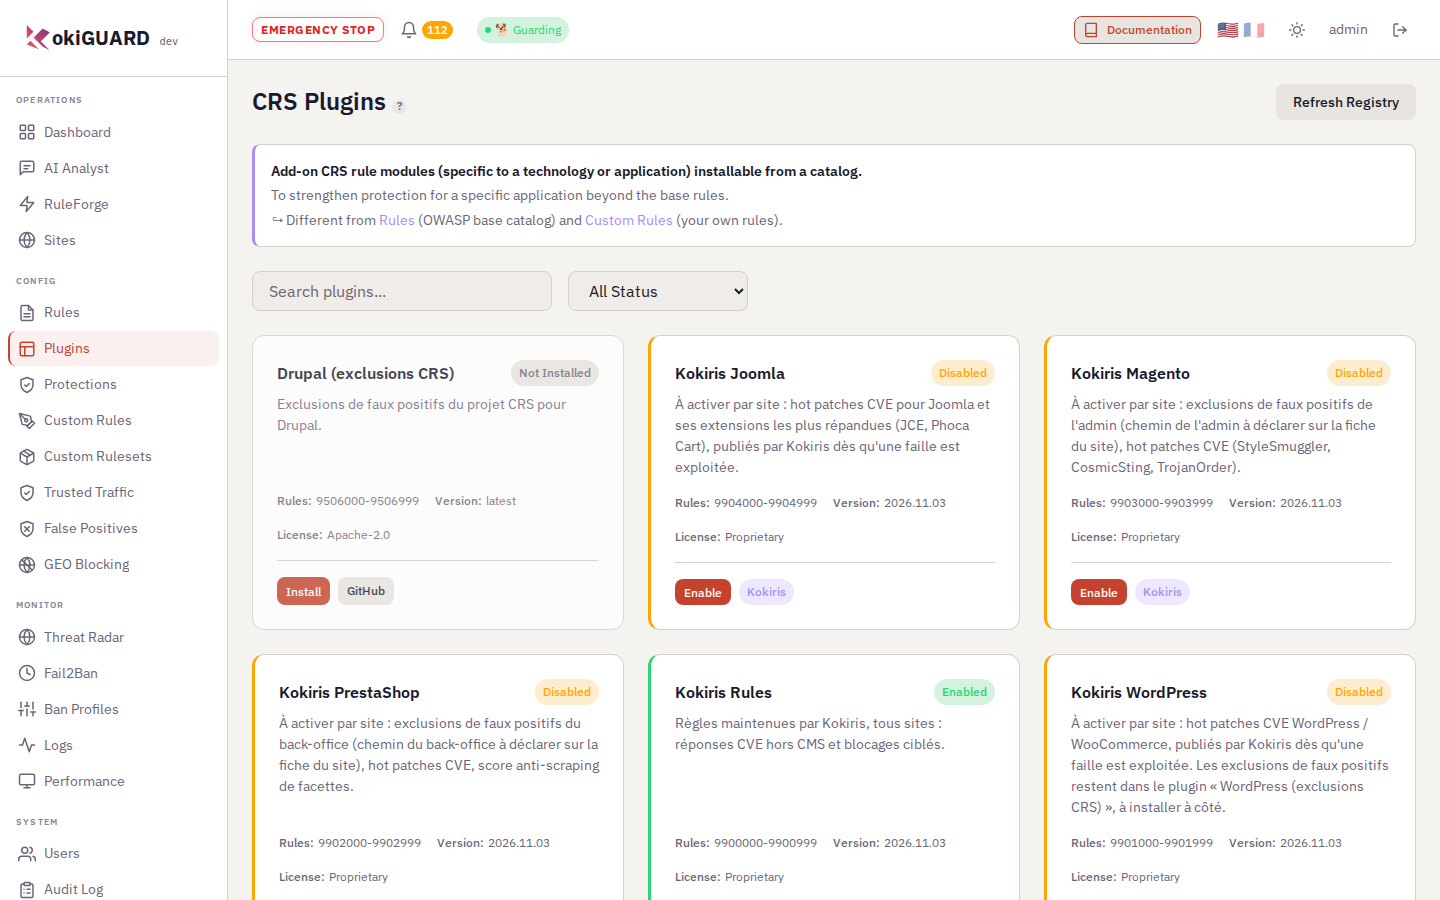
Plugins. The Kokiris sets have a badge, and you update them from this page. A CMS set shown as Disabled here can be active on a site: you enable it site by site.
The "Enable" button of the Plugins page enables the set on all sites. For one site only, use the site page.
The Kokiris PrestaShop and Magento sets recognize the back office only under the declared Back-office path. Without it, the actions of the administration lose their exclusions, and some of them are blocked as attacks. The path starts with /; leave the field empty for the other CMSs.
- You enable a CMS set in the site page, not in the Plugins page.
- PrestaShop and Magento: declare the back-office path of each shop.
- To update a set: "Refresh Registry", "Update", then "Apply Changes".
- A Kokiris rule in detection only reports without blocking and gives 0 points (chapter 2.4).
You want to enable the Kokiris WordPress set on only one of your sites. Where do you click?
5.2 RuleForge and custom rules
- Create a rule without writing ModSecurity syntax.
- Know when to move to custom rules.
RuleForge starts from your need, not from the syntax. It asks one question, "What do you want to do?", and generates the configuration:
- Block a threat: an IP, a country, a robot, a pattern, or too many requests.
- Trust something: an IP, a path or a parameter, forever or until a date.
- The WAF blocks something it should not: starts from a recent block and proposes the correct scope.
- Harden protection: validate the expected parameters, restrict the HTTP methods.
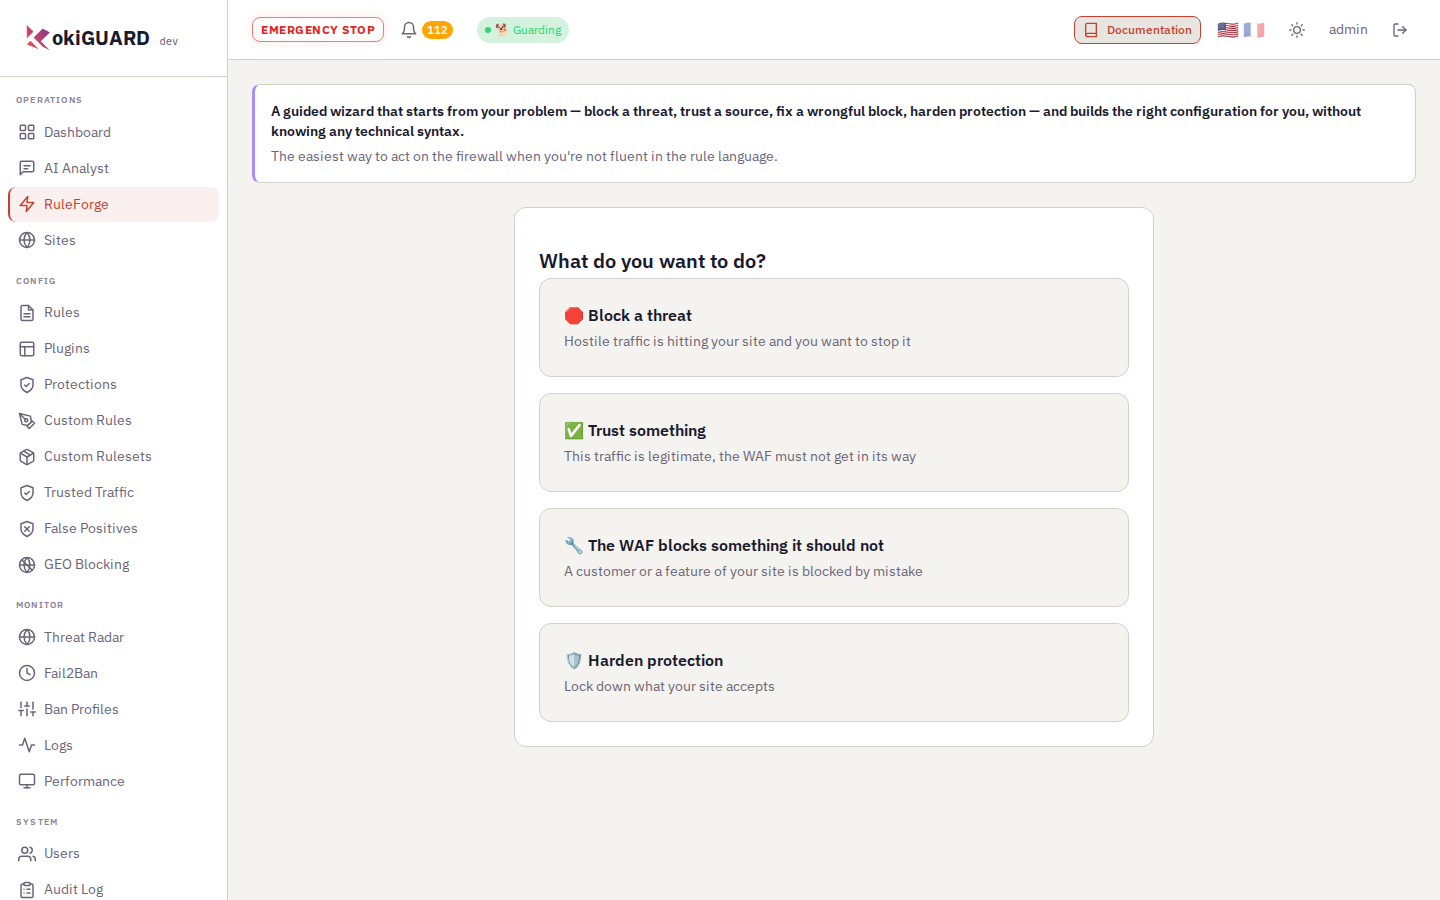
RuleForge. For a new rule, think of it first.
When RuleForge does not cover your need, use Custom Rules, as for the canary rule of chapter 2.3. To apply the same rules to several sites, put them together in a group, on the Custom Rulesets page.
- A rule that the engine cannot load is refused when you save it, with the reason given by the server, in English.
- An
allowrule without a site stops all the rules that come after it for the requests that it targets: the form warns you. - You write a pattern as an ordinary regular expression:
\.means a dot,union\s+selectmeans the word "union", spaces, then "select". With the versions before October 2026, the patterns with a backslash never matched: an old rule of this type can start to block, so check its effects in the logs.
The last screen of RuleForge tells you. An IP ban is "Active immediately". All the rest is "Saved, not active yet": the rule waits in the pending changes, click "Apply Changes" in the banner. If your account cannot apply, the screen tells you whom to ask.
5.3 Revisions, cluster and performance
- Identify the leader node.
- Go back to a previous revision.
- Read the state of the services and reduce the inspection of static files.
- Read the usage of the month in the Pricing Plans page.
- Manage the SSL certificates of a node.
Depending on your plan, kokiGUARD runs on one or more nodes. With several nodes, only one node, the leader, accepts changes: Redis Sentinel selects it. The leader builds the revision, applies it, then publishes it to the other nodes.
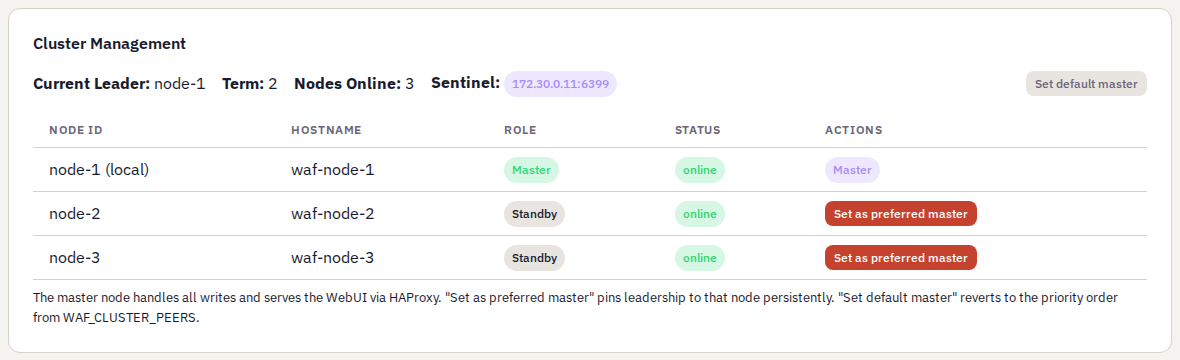
Cluster management. Current leader, online nodes, and buttons to choose a preferred master.
- To go back: Revisions, View Diff with the version in service, then Apply on the validated revision that you want.
- To check the services: Performance shows the requests per second, the sessions, and the state of HAProxy, of Coraza and of the link between them, node by node.
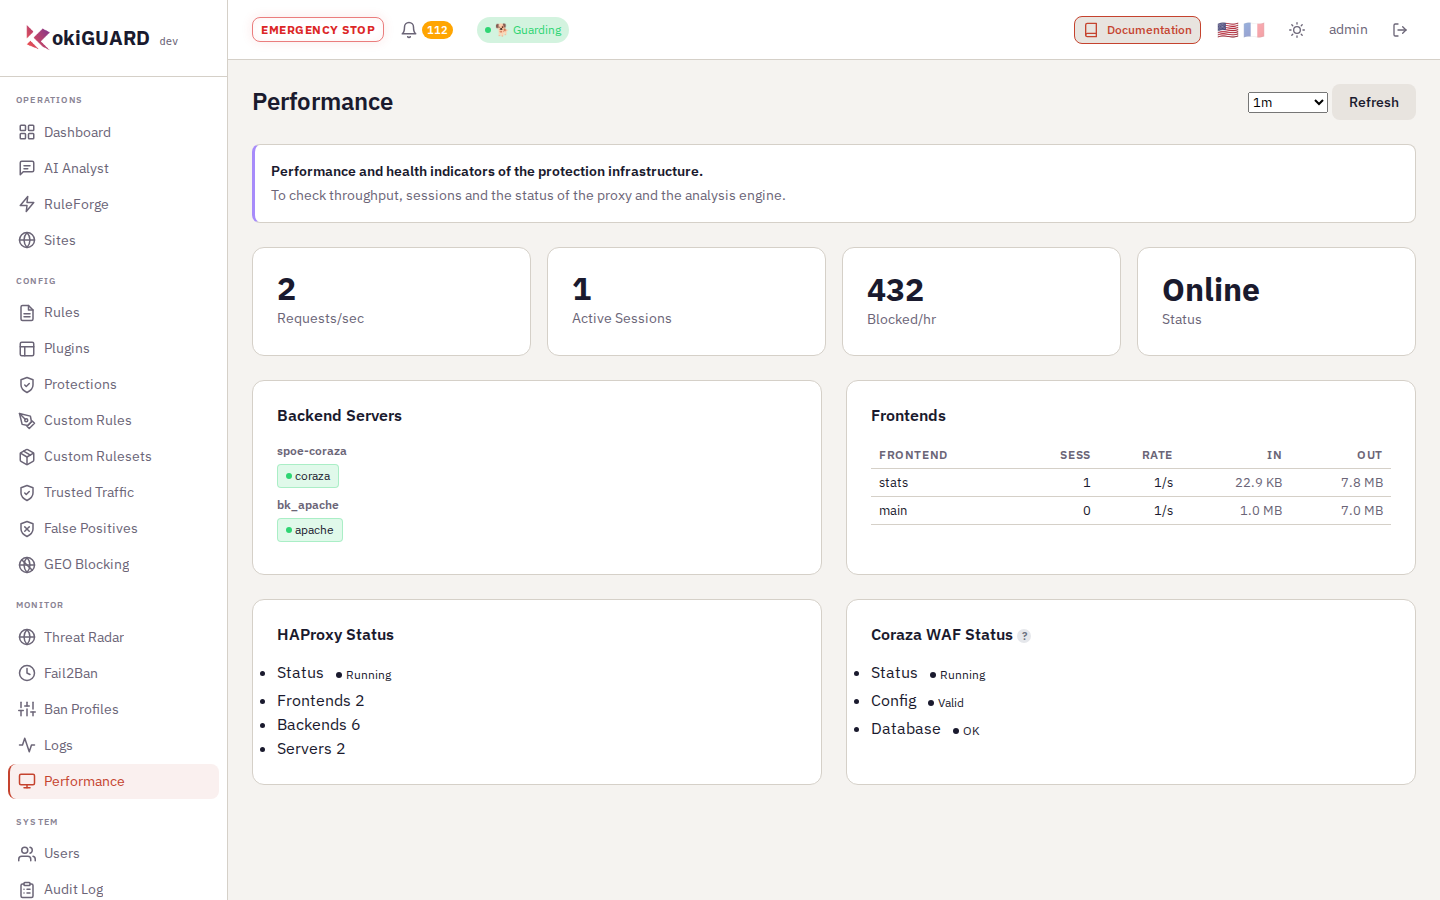
Performance. The first screen to open if a site becomes slow.
If Coraza no longer answers, your sites stay reachable: HAProxy lets the traffic through without inspection rather than cut it off. But the failure is not silent: Performance shows the coraza-spoa server out of service, the HAProxy log records each request that was not inspected as an error, and the Kokiris monitoring gets an alert.
Do not inspect images, fonts and videos
On a shop, images, fonts and videos often make most of the requests. In Settings, Default WAF Settings card, the option Do not inspect images, fonts and videos lets them through without the WAF engine: less load, and faster pages at peak time. It takes effect at the next Apply.
- Only GET and HEAD requests for files such as
.jpg,.png,.webp,.svg,.woff2or.mp4are concerned. The.css,.js,.pdfand.mapfiles stay inspected. So do a path with unusual characters, parameters other than a simple cache-buster (?v=123), or a.phpsegment. - Bans, rate limits, country blocking and the JavaScript challenge still apply. The billed volume does not change.
Follow the usage in Pricing Plans
The Pricing Plans page shows the Current usage of your installation: the number of sites, the number of customizations and the request volume of the month, with the Active grid, the Tier reached and the Estimated price. The Volume history gives the previous months, and the Price simulator calculates the price of a different usage.
- The tier used is the highest tier reached on one of the three measures.
- Customizations are your configuration objects: custom rules, false positive corrections, trusted traffic rules, rule groups, ban profiles (except the Default profile) and custom error pages.
- A month starts and ends at midnight in the Billing time zone: Settings, Billing card,
Europe/Parisby default. - With a grid in Overage mode, the volume does not change the tier: the part above the Included volume is billed at the Overage price (€), per block of Unit (requests).
- The requests of the kokiGUARD panel itself are not counted.
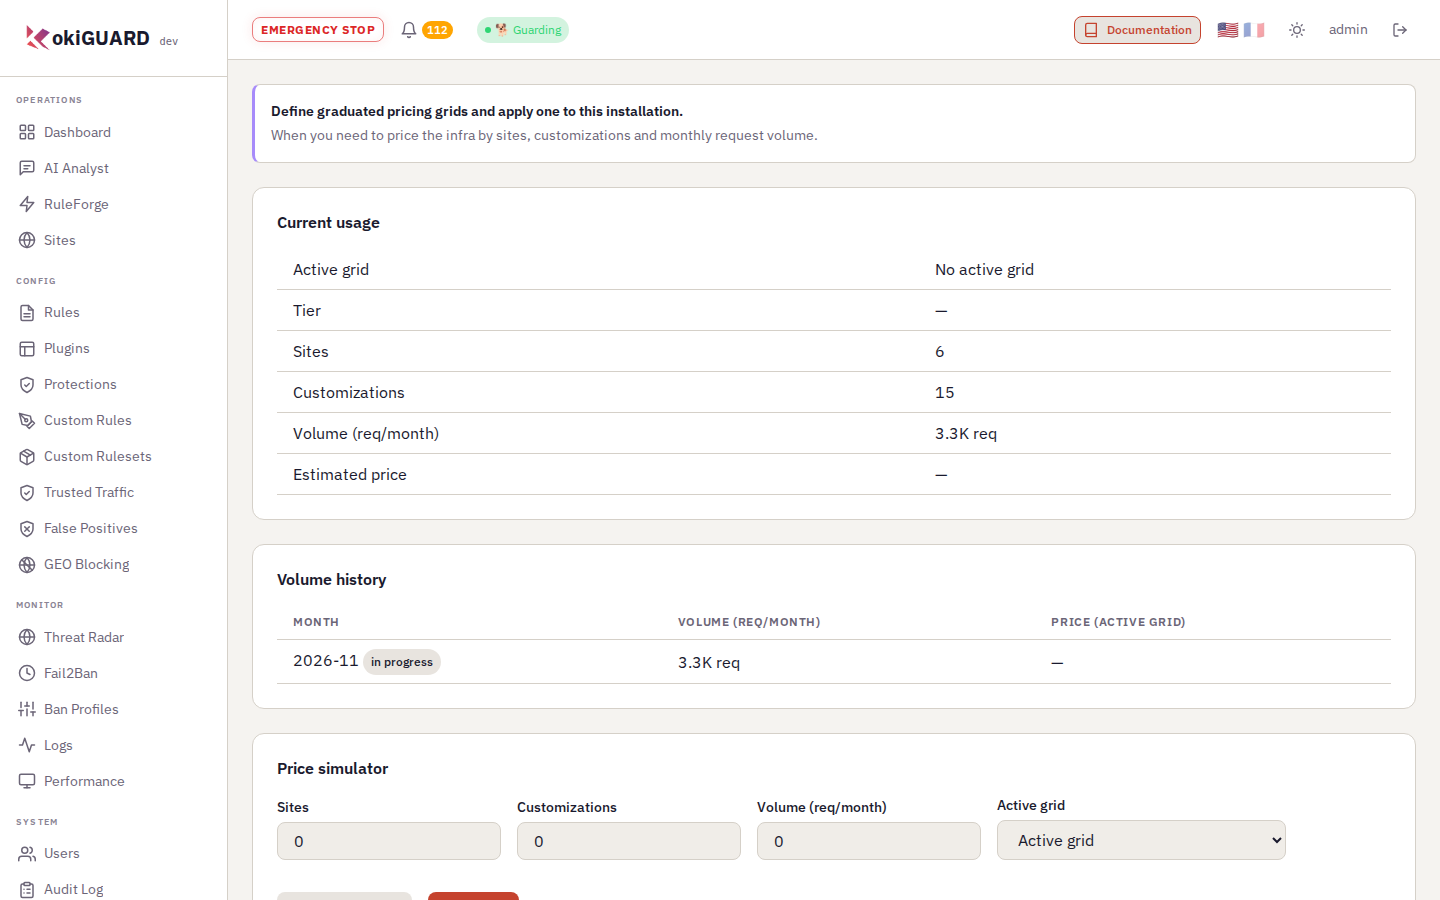
Pricing Plans. The usage of the current month. Here, no grid is active yet: the tier and the estimated price stay empty.
The Pricing grids show your plan: talk to Kokiris before you change one.
SSL certificates
On a node hosted by Kokiris, the SSL Certificates page (System menu, administrator) manages the Let's Encrypt certificates of your domains: their expiry date, adding a certificate, deleting a certificate and renewal.
- Point the DNS of the domain to your kokiGUARD: Let's Encrypt checks it over HTTP.
- Click Add a certificate, type the domains, one per line (the first one names the certificate, no
*.wildcard), then click Check DNS. - Type the Email of the Let's Encrypt account, then click Create. The operation can take several minutes.
kokiGUARD installs the certificate and copies it to the other nodes at once: there is nothing to apply. Renewal is automatic, 30 days before expiry; Renew now starts it at once for the certificates that are due. On a node that does not have this tool, the page shows "Certificates are not available on this node": ask Kokiris.
The message, in English, comes from the server. "This node is in standby mode": you are connected to a node that is not the leader, log in again through the main address of the panel. If the message mentions "lease" or "term", try again in a few seconds; if the error continues, tell Kokiris.
5.4 The AI assistant
- Configure an AI provider and choose the fields that it will never see.
- Have an event explained, then let the AI propose a correction.
- Ask for the report of the last 24 hours.
- Ask the AI Analyst a question.
The AI assistant explains, in the language of the panel, what the WAF saw, and helps you decide. It works with any OpenAI-compatible service: Mistral, DeepSeek, a local model through Ollama or vLLM.
Configure
- In Settings, AI Assistant card, type the API base URL, the key and the model name. The example below uses DeepSeek (
https://api.deepseek.com/v1, modeldeepseek-flash). Kokiris can do this setting for you. - Choose the Response style: Technical, Standard or Explainer.
- In Fields masked for the AI, add one cookie, parameter or header name per line, for example a custom session cookie. End with
*for a prefix, such asPrestaShop-*. - Click Save, then Test connection. A green tick confirms.
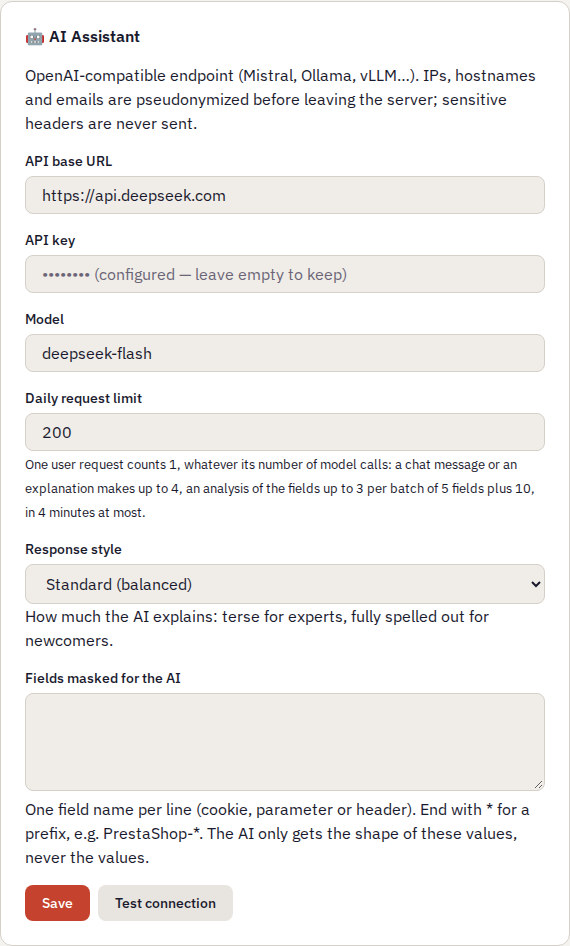
AI assistant configured. You can never read the key again: it shows masked after you save it. The Fields masked for the AI field is empty by default.
The context sent contains only the shape of the values and the useful fragments. Never the value of a cookie or of a secret (password, token, card number): only its shape, such as <b64:44>. Pseudonyms replace IP addresses, domain names and emails, and kokiGUARD puts the real values back when the answer comes back. A field of the Fields masked for the AI list goes only as a shape, never as a value; in a radiography, the crossed-out eye button next to a field name adds the field to this list (write right on the settings). Finally, the AI consults only what your account has the right to see.
Have an event explained
In Logs, click 🤖 on a line. The answer comes live in a side panel. On a line that groups many requests, the AI reads the 50 most recent ones, and the title of the panel says so.
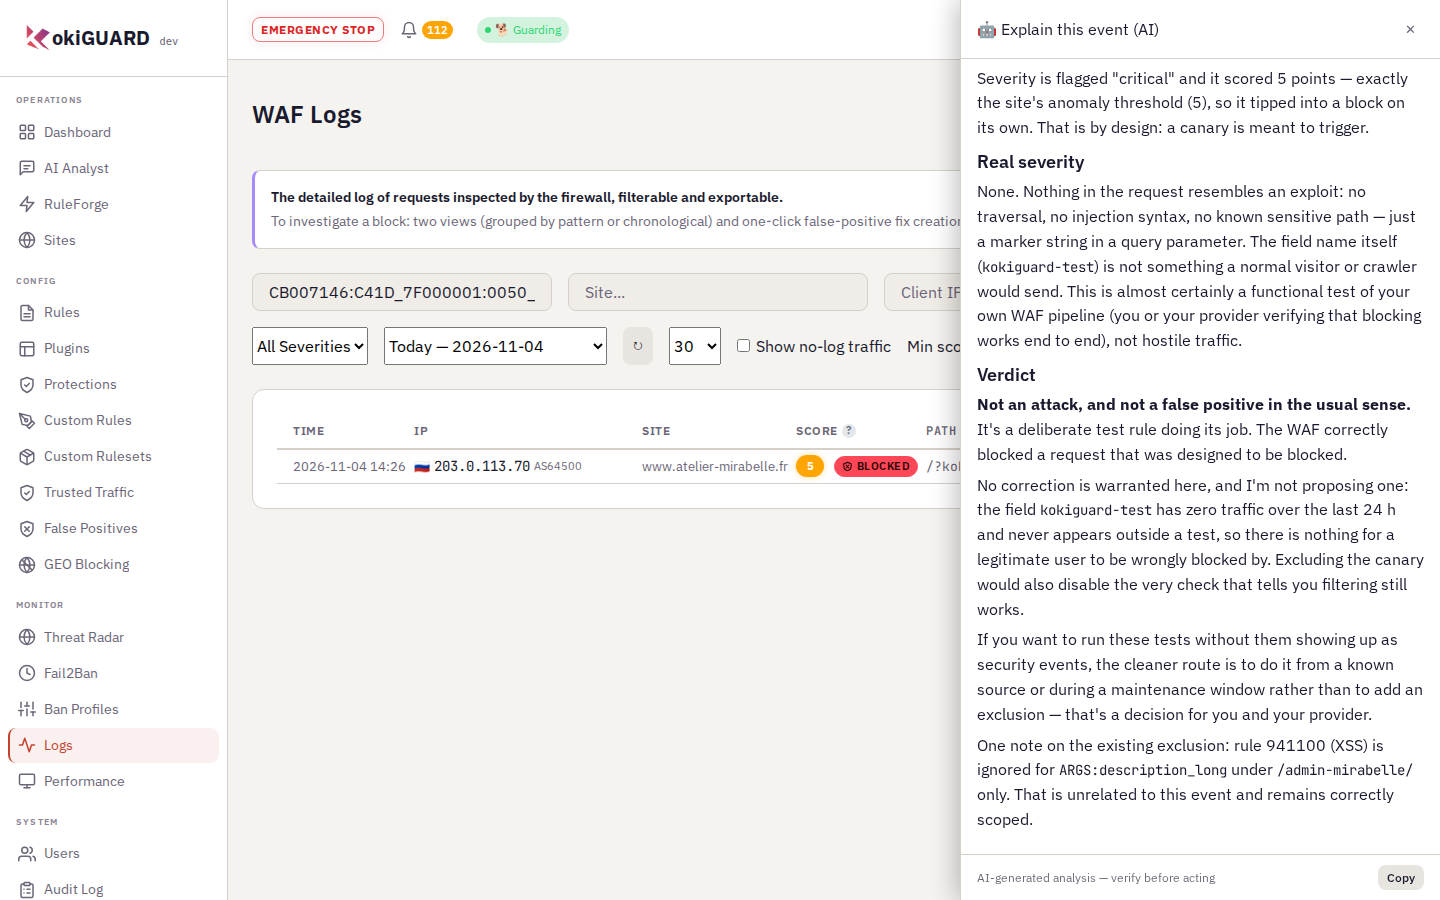
Explanation of a block. The AI recognized the canary rule as a deliberate test, and not as an attack. It also explains why it proposes no correction.
Let the AI propose a correction
When the AI concludes that a block is a false positive that nothing covers yet, it proposes a correction, and the server checks it as if you had typed it. A 📋 card summarizes it and shows the generated rule. Prefill exclusion opens the Fix a rule form: you read it again, you save, then you apply. The AI never saves anything itself, and this button needs the right to write false positives.
On the False Positives page, 🤖 Analyze with AI examines the Fields that trigger rules card: one verdict per field (FALSE POSITIVE, ATTACK or UNCERTAIN) with its reason, one correction card per family of false positive fields, and one summary sentence per group of fields. The AI gets the fields in small batches, one after the other: the analysis always goes to the end. A field that the AI could not process shows NOT ANALYZED, with the reason: answer too long even for this field alone, provider error, or analysis budget reached. One analysis counts as a single request of the quota.
The report of the last 24 hours
On the Dashboard, the 🤖 AI report (24h) button opens a security report in the same side panel: volume and trend, notable attacks, most aggressive IPs, most triggered rules, and two or three recommendations at most. You need the right to read the dashboard or the logs. One report counts as one request of the quota.
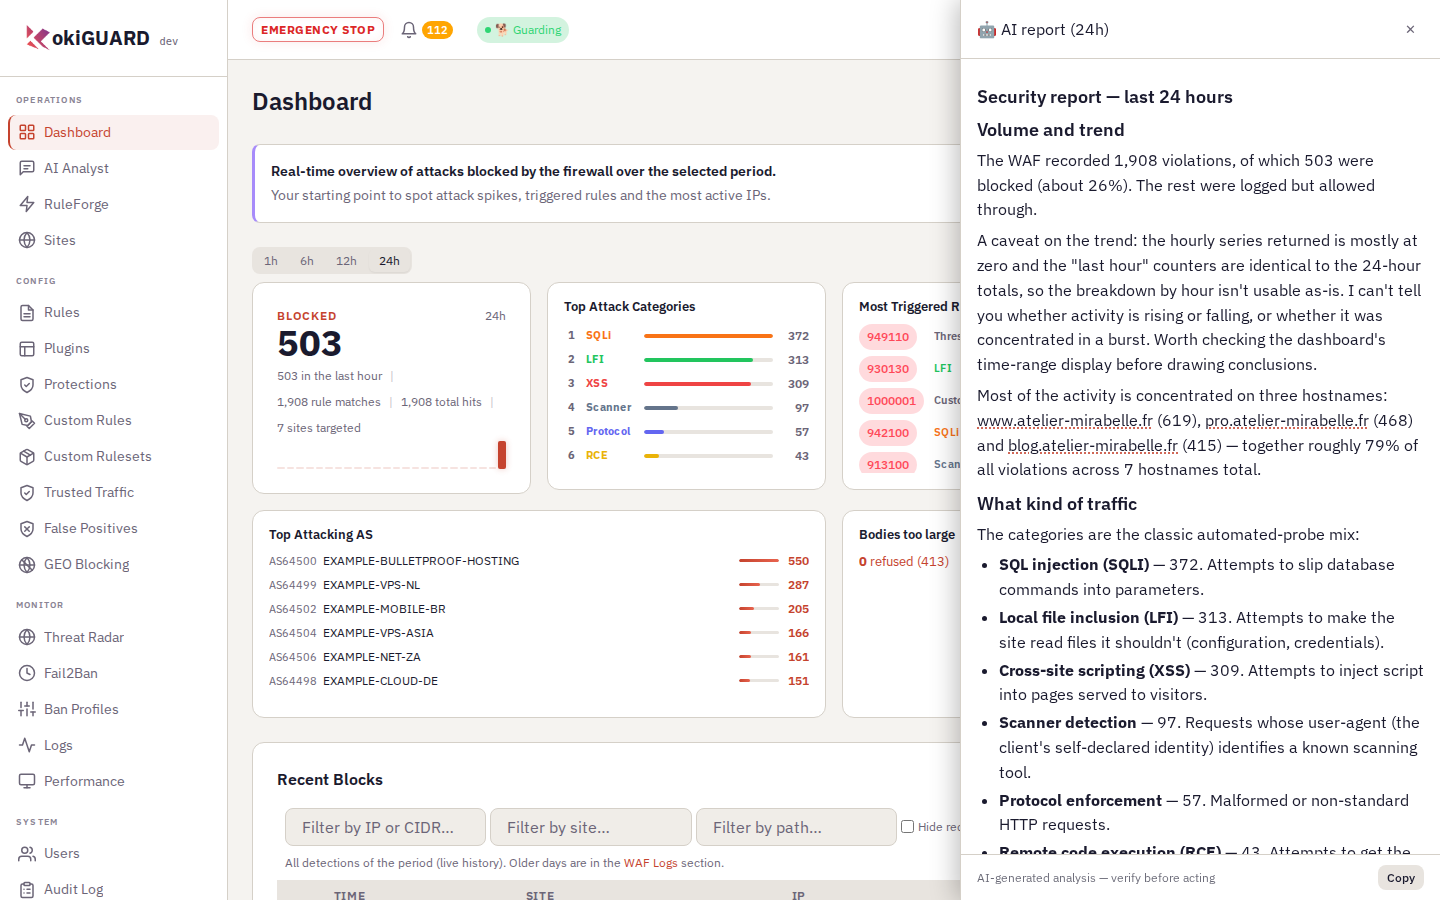
AI report (24h). Useful for a Monday morning review. As for all AI answers, check its recommendations before you act.
Ask the AI Analyst
The AI Analyst page is a conversation. The agent itself consults the logs, the statistics, the IP reputation and the configuration of the sites, then answers. Each tool that it uses shows as it works.
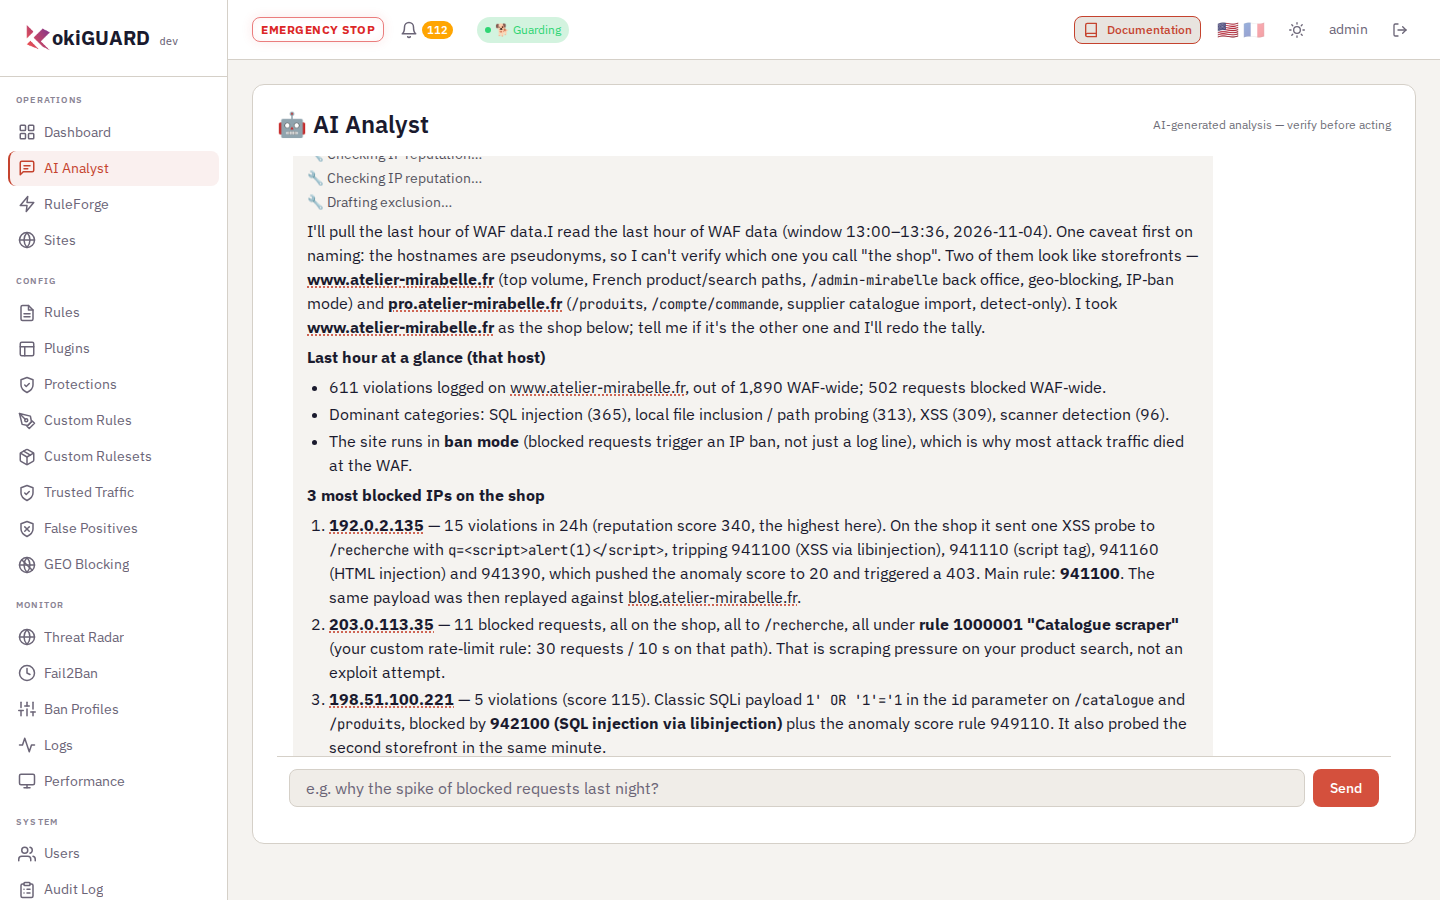
AI Analyst. The agent first identified "the shop", then searched the logs and the IP reputation. It states its assumptions: if it is not the correct site, tell it.
Each answer has the note "AI-generated analysis — verify before acting". The AI proposes, you decide. The daily quota (200 requests by default) protects your budget.
Does the AI see the real IP address of a visitor?
5.5 Accounts, rights and API keys
- Create an account with the Custom profile.
- Understand the reseller and member accounts of a shared kokiGUARD.
- Create an API key for a script, without giving it more than necessary.
- Know what closes a session.
The four roles of chapter 0.2 go from Viewer to Admin. When no role fits, the Custom profile gives a grid of rights: for each page or function, a Read box and a Write box, in four groups (Operations, Configuration, Monitoring, System).
- Open Users, then click Create User.
- Type the Username and the Password.
- In Profile, choose Custom, then tick the boxes that you need. For a web agency that fixes its false positives: Dashboard and Logs in read, False positives in read and write.
- Click Save.
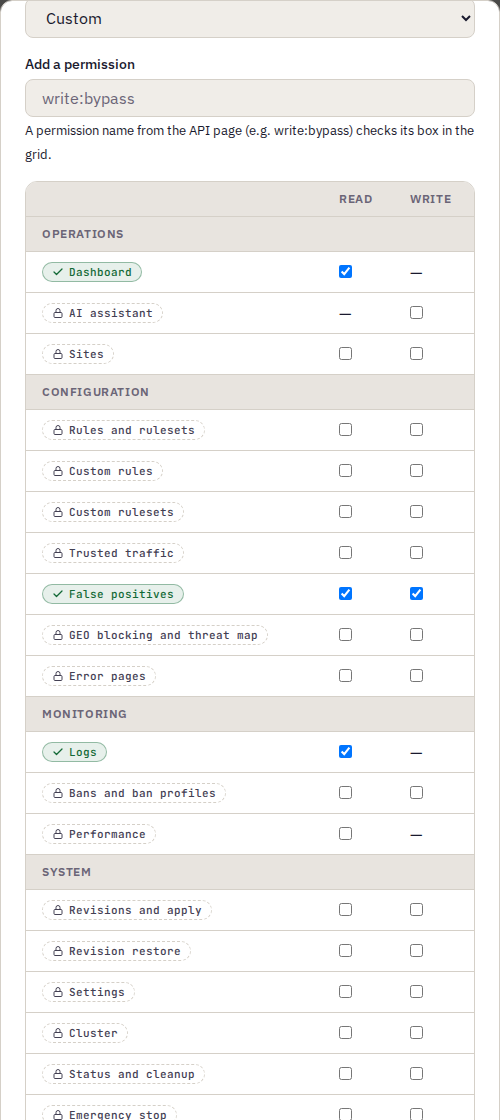
Custom profile. This account sees the dashboard and the logs, and fixes the false positives. Nothing else shows in its menus.
- When you tick Write, Read is also ticked: you cannot change what you cannot see.
- Without Revisions and apply in write, the account prepares its corrections, and an editor or Kokiris applies them.
- The Users row stays reserved for administrators, and the last administrator cannot lose their rights.
- A change to the rights or the password of an account closes its sessions: the user logs in again with the new rights.
Resellers and members: the shared kokiGUARD
One kokiGUARD can protect the sites of several clients, for example the sites of an agency and of its own clients. The Account type field of the Create User window makes this possible:
| Type | What it does |
|---|---|
| Standard | An ordinary account, with a role or a Custom grid, on all sites. |
| Reseller | A grid of rights, never a role, and a list of sites: its own sites. It sees and changes only these sites: their corrections, their trusted traffic, their custom rules, their plugins, their robots, their logs and their dashboard. A site that it adds becomes its own. It creates its own member accounts. |
| Member | An account created by a reseller, on part of the reseller's sites, with part of the reseller's rights. It creates no account and no site. |
- An administrator opens Users → Create User, chooses Reseller in Account type, ticks its rights then its sites, and saves.
- The reseller, logged in, opens Users: it sees only its members there. Create User creates a member, on the sites and with the rights that the reseller chooses among its own.
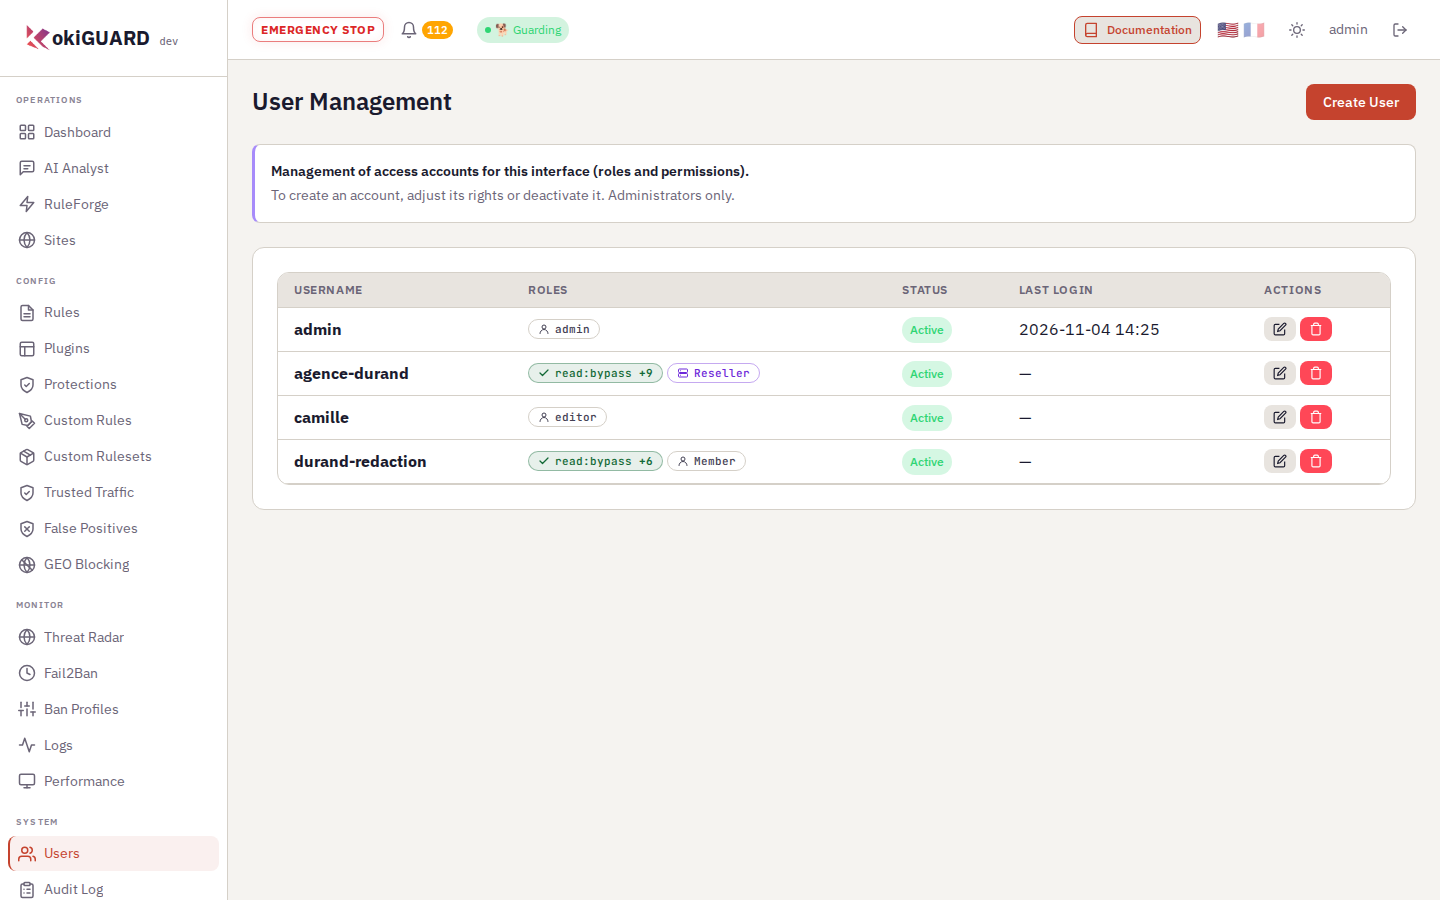
A reseller and its member. The rights show as pills; the member never goes above the rights or the sites of its reseller.
A reseller or a member never touches what applies to all the sites of the platform:
- no Global (all sites) entry, and no rule on the catch-all, a wildcard or a system site;
- no new IP group, no shared rule group;
- no ban, no Challenge mode, no Threat Radar: the reputation is common to all sites (chapter 2.1). Its custom rules block, but give no reputation points;
- no Apply Changes button: the hosting provider turns on automatic apply (chapter 2.2);
- a trusted address must have a condition (chapter 3.2).
For this account, the site of another account answers as if it did not exist. An API key created by a reseller or a member gets the type and the sites of that account. A change to the type or the sites of an account closes its sessions, and a site removed from a reseller is also removed from its members.
On a shared platform, Kokiris can also route each site to its production server (Backends page, for the administrator only) and count the requests of the month per reseller, for billing.
API keys
An API key gives a script, for example a monitoring tool, precise rights without the password of an account.
- In Settings, API Keys card, click Create API Key.
- Give a Name, choose a Profile or a Custom grid, and an Expires date (never if the field stays empty).
- Confirm with Create API Key. The key shows only once: click Copy and keep it in the vault of your tool.
The script sends the key in the Authorization header. To check the rights of a key, replace the address with the address of your panel:
curl -s -H 'Authorization: Bearer kwaf_…' https://panel.example.com/api/v1/auth/me
- A key never has more rights than the account that creates it: the wider profiles are greyed out. If the rights of that account become lower later, a key that is now wider than the account is disabled.
- A key cannot create another key.
- Revoke deletes the key.
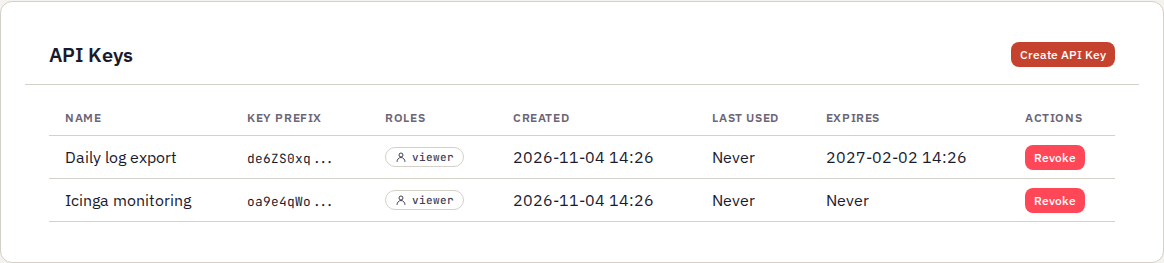
API keys. Only the prefix of each key stays visible. The Last Used column helps you find a forgotten key to revoke.
To know which route to call and which right to tick, open the API page (chapter 5.6).
- Custom = a Read / Write grid, box by box. The menus follow the grid.
- A reseller works only on its own sites, a member on part of the sites of its reseller.
- An API key never does more than its creator.
- A change to the rights of an account closes its sessions.
Your web agency must be able to fix the false positives of your sites, and nothing else. Which profile do you give it?
5.6 The API page
- Find the API route that does what you want, and the right that it needs.
- Try a read from the panel, then copy the curl command for a script.
All of the panel uses a REST API: same routes, same rights. The API page, in the System menu, gives its reference. It is open to every logged-in account.
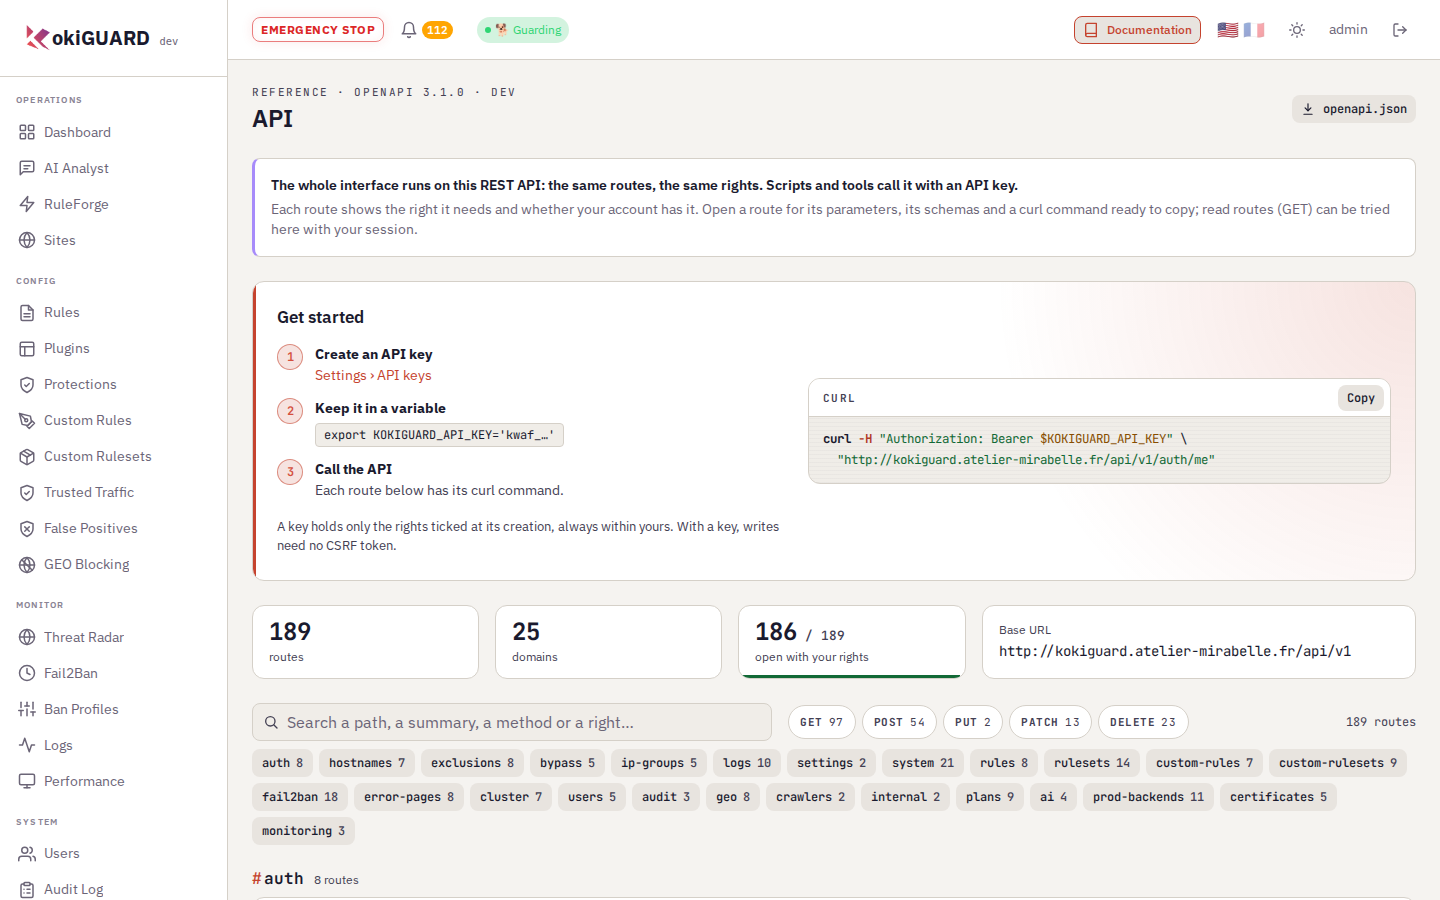
The API page. The Get started box, then the number of routes, of domains and of routes open with your rights. At step 1, a Viewer account also reads that it must ask an administrator for its key.
- The Get started box gives a summary of the procedure: create an API key (chapter 5.5), keep it in a variable, then call the API.
- Search for a route by its path, its summary, its method or its right, or filter by Methods and by Domains (
hostnames,fail2ban,logs…). - Open the route. At the top, you see the right that it needs and if your account has it: "You have this right", or "Missing right: write:fail2ban". For a reseller or member account, a route that does not apply site by site (bans, IP groups, global entries…) shows "Refused to your account", whatever the rights of the account. Below, you see its parameters, its body and its responses.
- Click Copy the curl command: the command uses the
KOKIGUARD_API_KEYvariable of the Get started box.
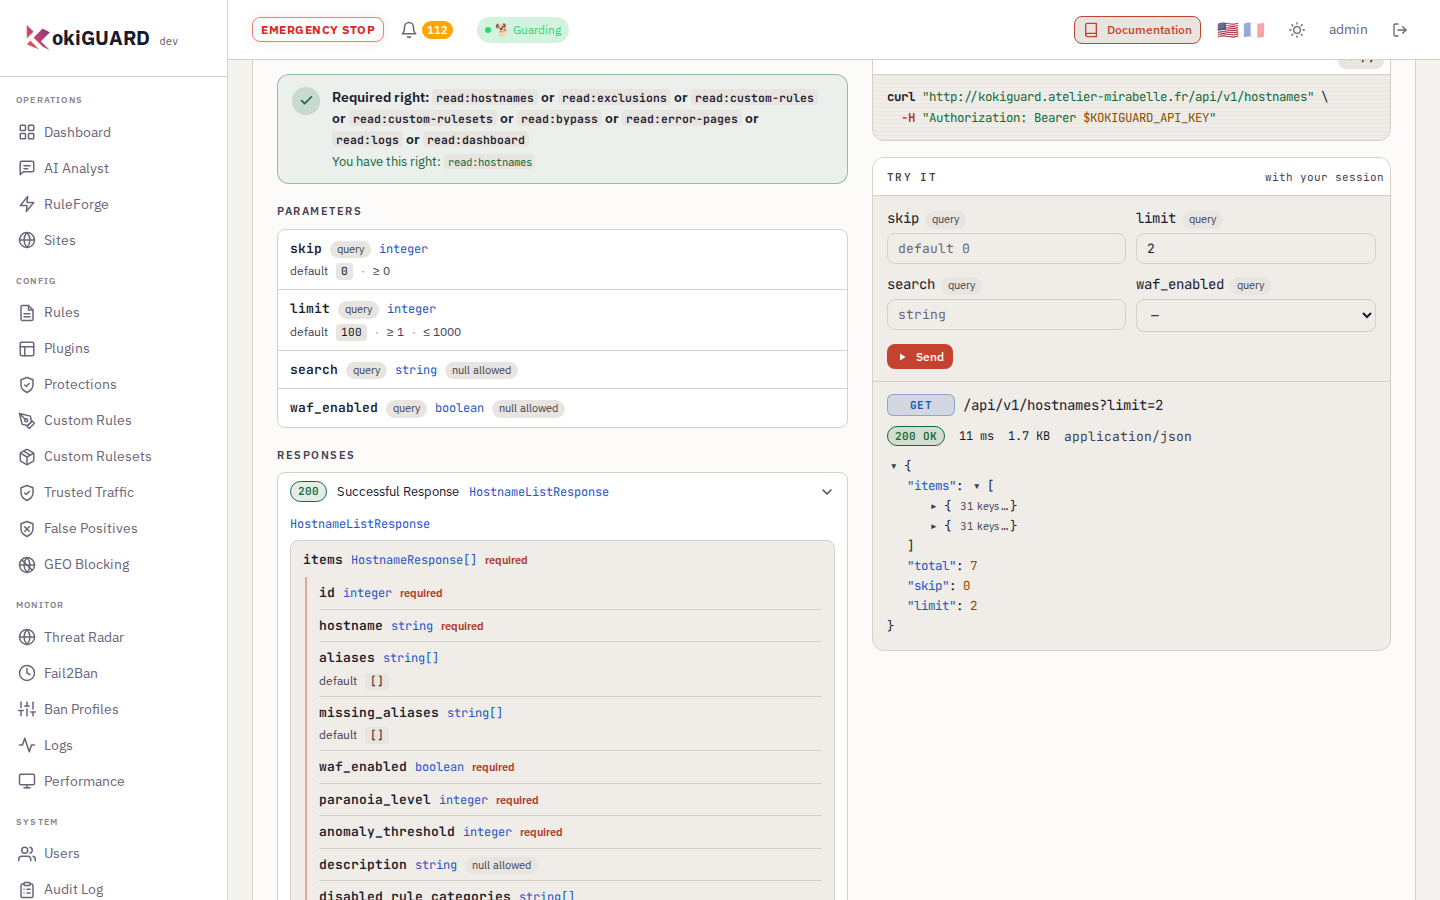
Try a read. The request goes with your session; the response shows with its code, its duration, its size and its JSON, which you can collapse.
- Try it is only for reads (GET). You cannot start a write (POST, PUT, PATCH, DELETE) from this page: use its curl command, with a key that has the required right.
- The
openapi.jsonbutton downloads the full description of the API, for Postman, Insomnia or a client generator. - The old
/docsand/redocpages no longer exist: the API page replaces them.
- The API page shows, route by route, the required right and if you have it.
- Try it = reads only, with your session. To write: curl and an API key.
- A key has only the rights ticked when it was created, always included in the rights of its creator.
- A reseller or member account sees "Refused to your account" on the routes that do not apply site by site.
You want to ban an address from a script, with the route POST /api/v1/fail2ban/ban. How do you test it?
- Read the list of Kokiris protections, enable the set of your CMS on a site and, for PrestaShop or Magento, declare the back-office path.
- Create a rule with RuleForge, and know when to move to custom rules.
- Compare and apply again a revision, identify the leader node, read the Performance page and the usage of the month.
- Have an event explained by the AI, let it propose a correction, and know what it sees.
- Manage the SSL certificates of a node.
- Create an account with the Custom profile, a reseller and its members, and a limited API key.
- Find a route in the API page and the right that it needs, then try it or copy it as curl.