Level 4 · Respond
Ban the addresses that insist, see where the attack comes from and from which network, know how to stop blocking in an emergency if a false positive hits production, spot the scanners that trigger no rule, and send a challenge instead of a ban. For a current problem on your site, go directly to What if….
4.1 Ban with Fail2Ban
- Understand the reputation of an IP.
- Find an IP and read its details.
- Ban and unban by hand.
- Adapt a ban profile.
In Ban mode, each block adds points to the IP, over a sliding window: critical 25, error 10, warning 5, notice 2. When the total reaches a threshold of the profile, Fail2Ban bans the IP for 10 minutes, 6 hours or 24 hours. With the default profile: 60 points in 5 minutes for 10 minutes, 120 for 6 hours, 180 for 24 hours. In the logs, the ⓘ help of the Score column gives the scale and the thresholds of the loaded ban profile.
A points-based driving licence, but in reverse: each block adds points to the address, and above a threshold, the address is kept out for a time. The more it insists, the longer it stays out.
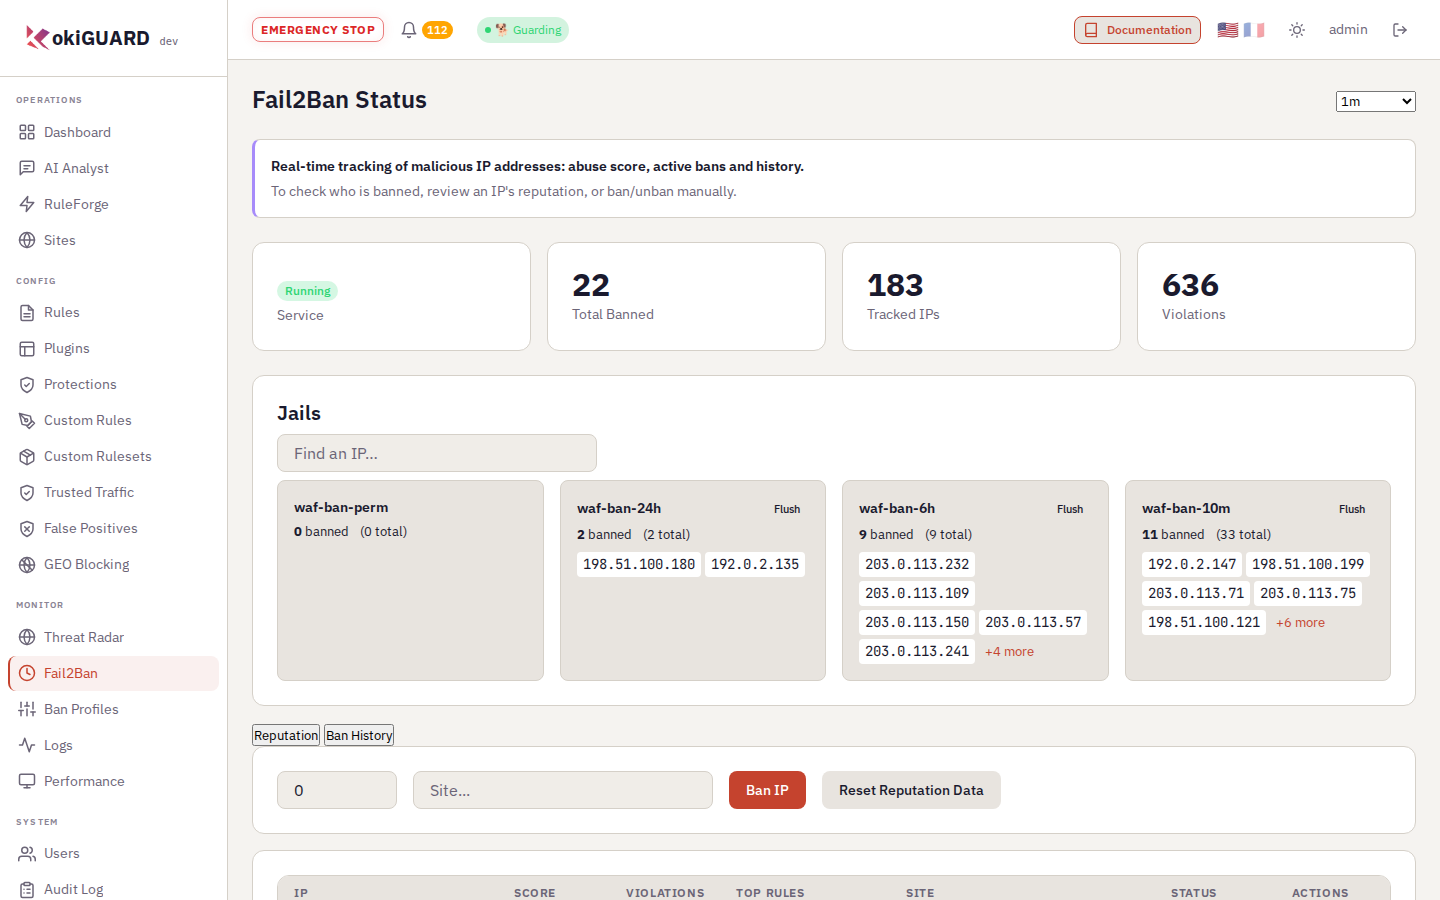
Fail2Ban. The four jails waf-ban-10m, waf-ban-6h, waf-ban-24h and waf-ban-perm (manual, no expiry).
- To ban at once: Ban IP, type an address or a range (for example
203.0.113.0/24), choose the jail and give a reason. The effect is immediate on all nodes. In the logs and the dashboard, the 🚫 button next to an address does the same. - To lift a ban: Reputation or Ban History tab, Unban button, or the IP details window (below). To unban all the addresses of a jail at once: Flush button of this jail, on all nodes.
- To change the thresholds: Ban Profiles, then assign the profile to the site in the site page. The Scan (HTTP errors) field counts only in the default profile (chapter 4.4).
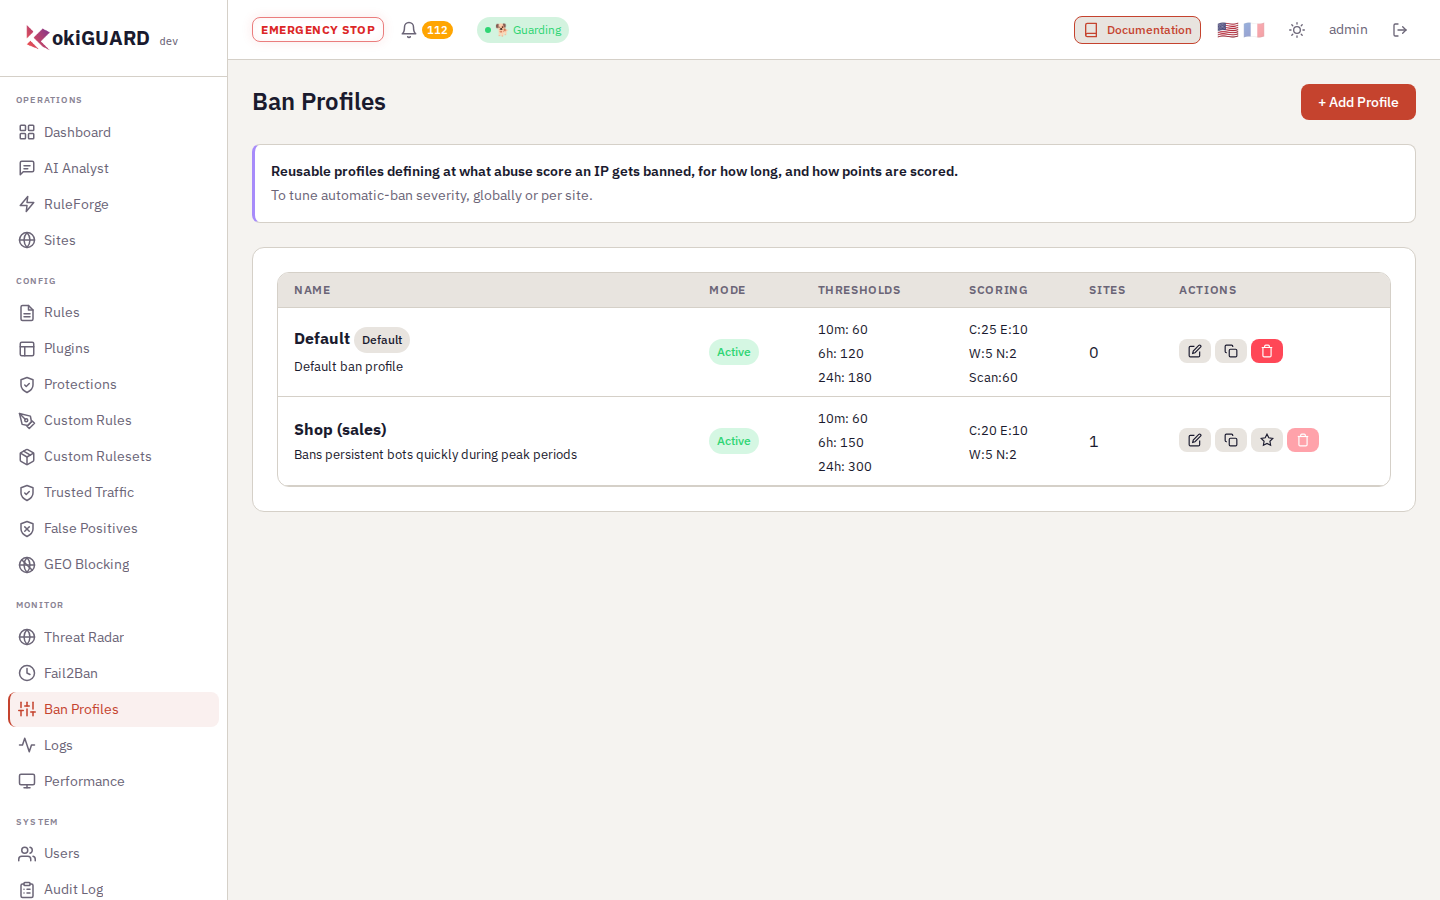
Ban profiles. Thresholds by duration, scale by severity, observation window and progressive bans.
Find an IP and read its details
Above the jails, the Find an IP… field filters the addresses as you type. Press Enter on a full address or range: the IP Details window opens, even if the address is not among the 500 shown per jail. A click on a banned address also opens it.
The window gives you all you need to decide:
- the country, with a button to copy the address;
- the ban state: the jail and the time left, or "Permanent"; or a challenge in progress (chapter 4.5);
- the current score against the 10-minute threshold of the default profile, the peak score and the number of violations;
- the history of its bans, its most triggered rules and the paths it targets;
- the actions Unban, Ban, WHOIS, Logs (the logs filtered on the address) and Clear reputation.
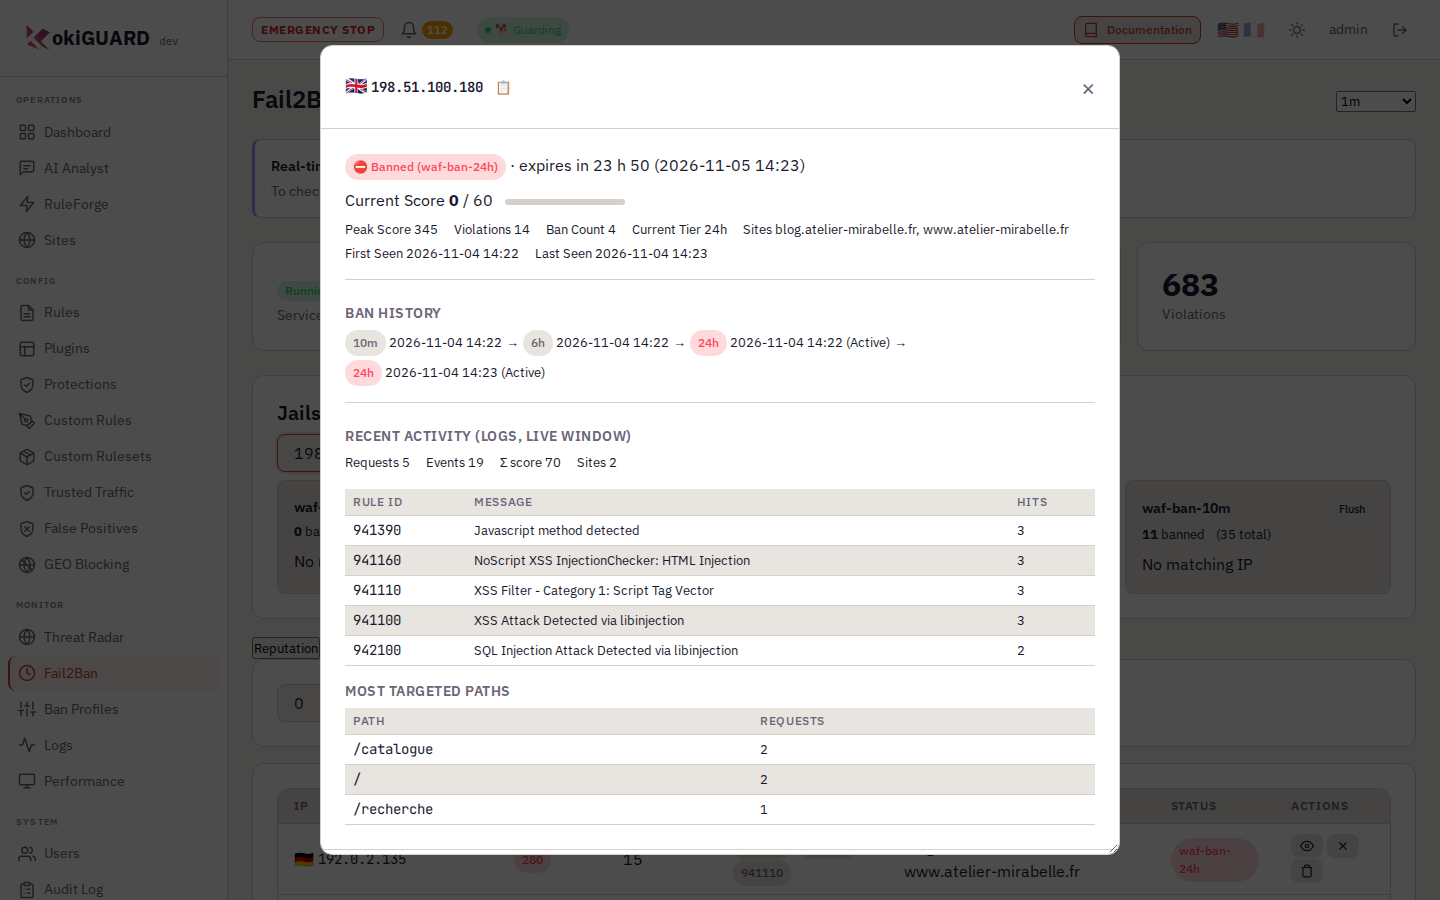
Details of an IP. The ban state, the score, the history and all the actions in one window.
You cannot ban loopback, private (10.0.0.0/8, 192.168.0.0/16…), CGNAT, link-local, multicast and reserved addresses, or a range that contains one of them: such a ban would cut off your platform itself (proxy, load balancer, probes), not an attacker. The panel refuses this ban with a message. You can always unban.
Send Kokiris the fixed IPs of your team (office, VPN) before you switch to Ban: they will be exempt from bans. If you do not, a test that insists a little can ban you from your own site.
On a cluster, the message "Done on this node only: the other nodes were not notified." can come after a ban, an unban or a jail flush. The action succeeded on the node that answers you, but not on the other nodes: tell Kokiris, so that the action is carried over to all nodes.
4.2 See where the attacks come from
The Threat Radar puts the detections of the last 24 hours, on all nodes, on a map, and ranks the most active countries and continents. When you hover over a country, it shows the 5 most active networks of that country. The Block button adds the country, or all the countries of the continent, to the global GEO Blocking list, with the action chosen on that page. Then apply.
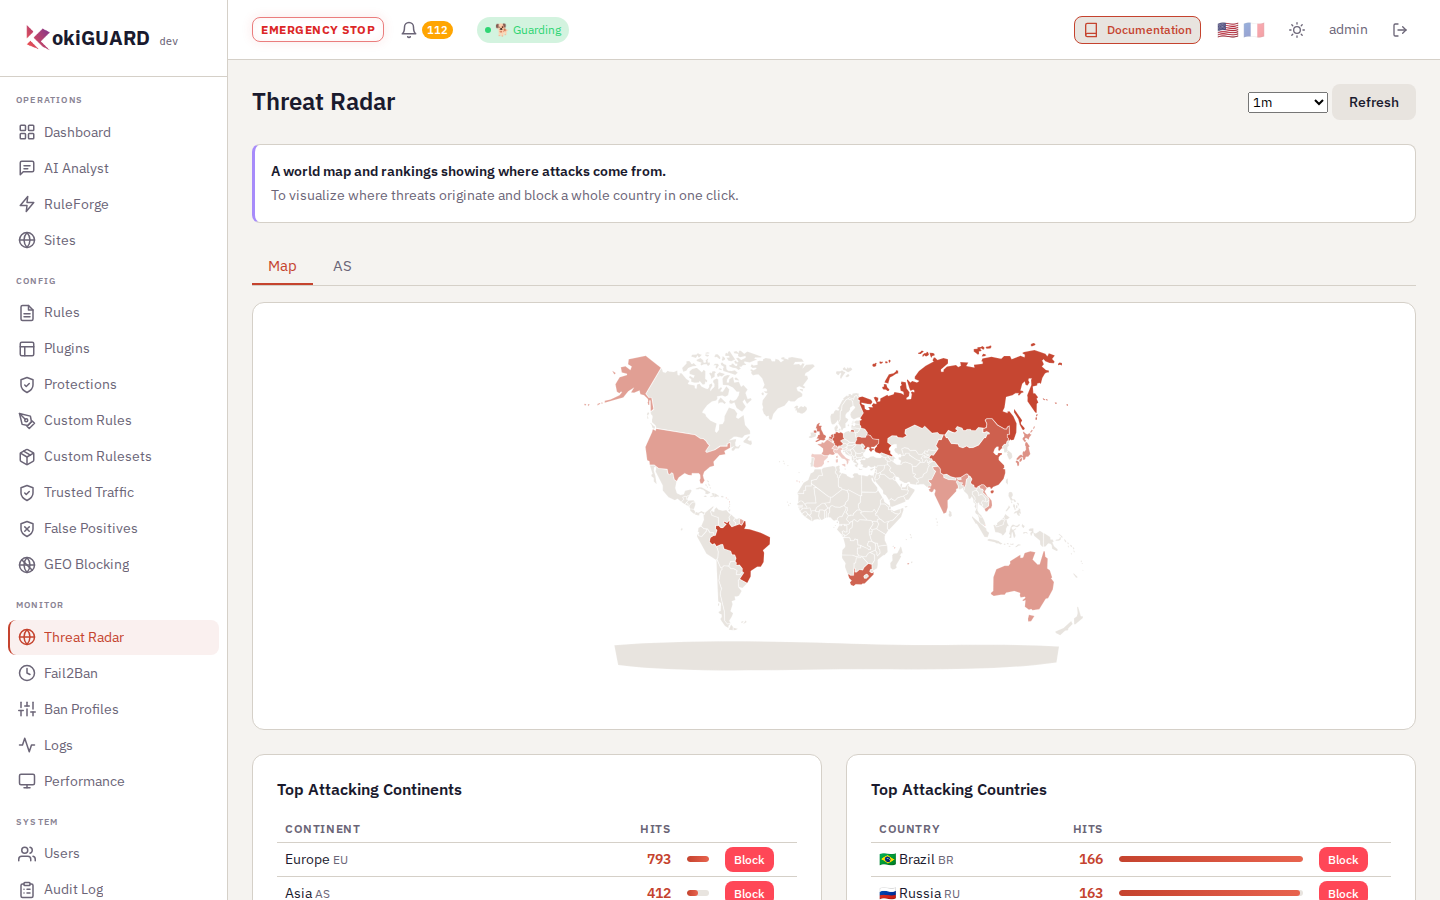
Threat Radar. Useful to spot a campaign that comes from one region.
Target a network rather than a country
A campaign often comes from one network, a hosting provider or a cloud provider, more than from one country. Each network of the Internet has an AS (autonomous system) number. The AS tab of the radar ranks the networks by number of detections:
- Open the AS tab, or click the AS badge of an address in the logs, or a line of the Top Attacking AS card of the dashboard.
- Expand the network: its address blocks show, with the detections and the IPs of each block over 24 h.
- Tick the blocks to remove (Tick the blocks with detections selects them all at once), then click Ban the selection and choose the jail.
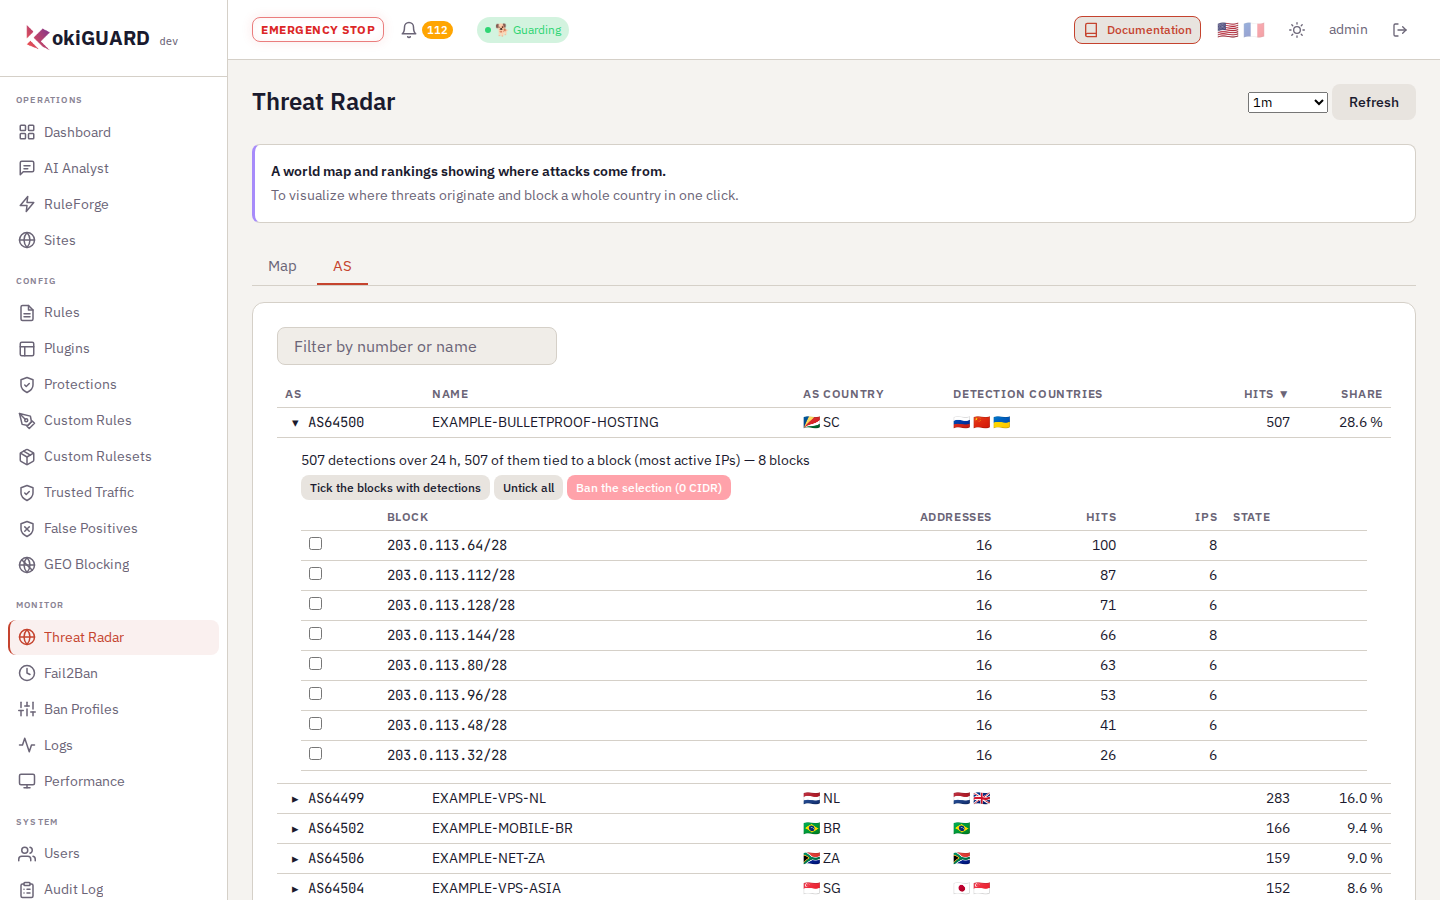
The most active networks. An expanded network shows its blocks; only the blocks with detections need a ban.
- A ban is set per block (CIDR), 256 blocks at most per action. The Stop button stops the sending, and a summary tells what was banned.
- A block that is too large (IPv4 larger than a /8, IPv6 larger than a /32) is marked Too broad and you cannot ban it.
- You need the right to ban (operator role). The radar is not open to reseller and member accounts.
Large cloud providers also host company proxies, VPNs and legitimate tools. Ban the blocks that attack, not the whole network, and start with a 10-minute or 6-hour jail.
Before you block a whole country, create the rule with "Detect only" and check in the logs that you do not lose real customers.
4.3 The emergency stop
- Know when to use the emergency stop and how to return to normal.
Use the Emergency stop button when a wrong block hits production and you have not yet found the rule that causes it.
- It records the mode of each site, then switches all sites to Detect and pauses the bans.
- It applies immediately, without the Apply Changes button.
- Traffic continues to flow and everything stays logged: you can look for the cause in the logs.
- During the stop, a red banner shows, and the button becomes ENABLE WAF. One click puts each site back in its original mode.
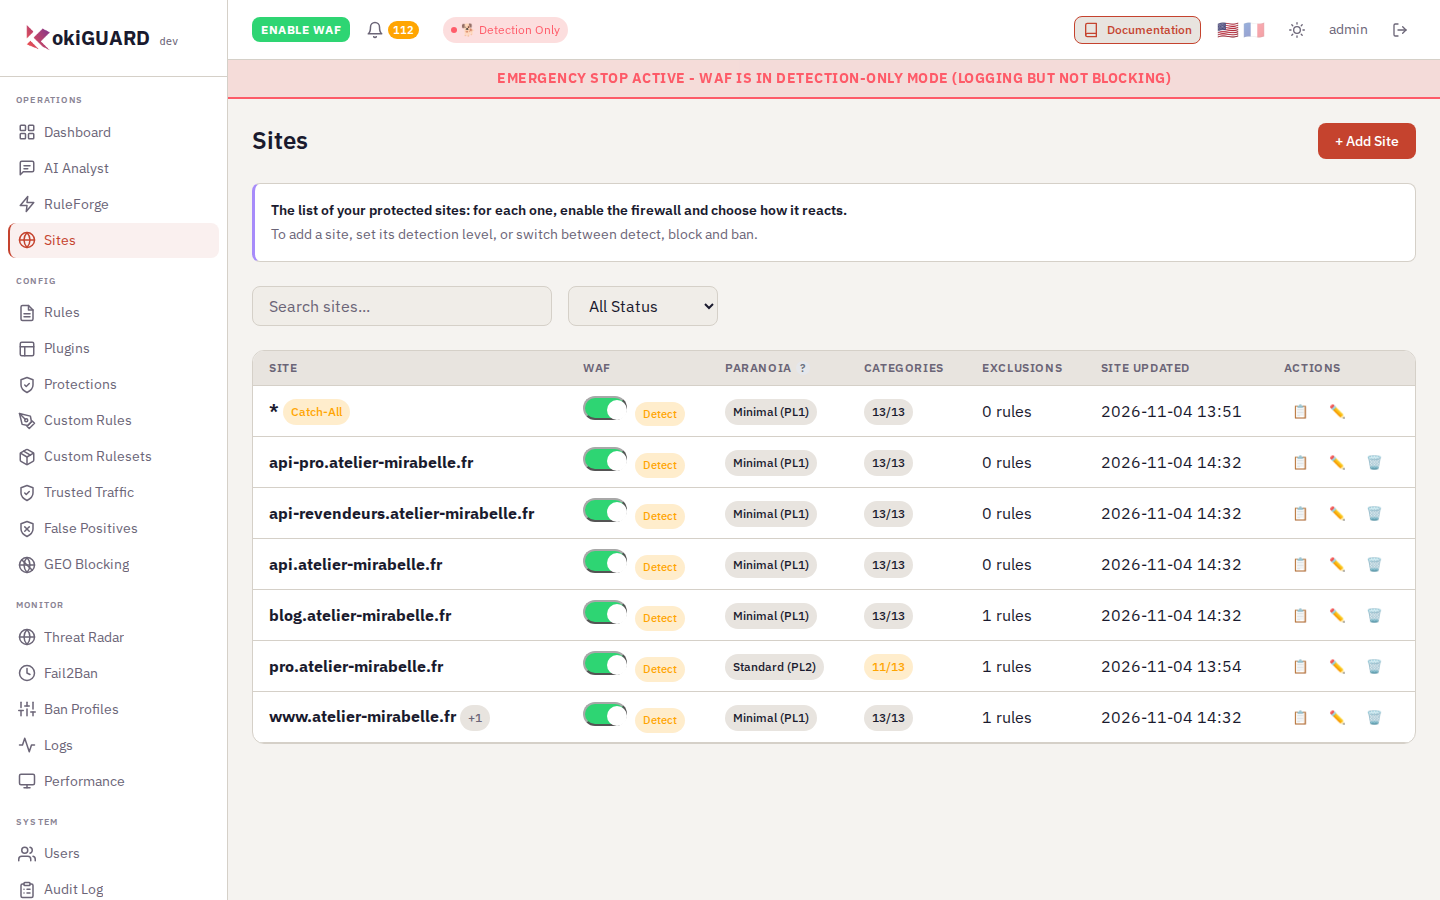
Emergency stop active. All sites show Detect. A click on ENABLE WAF, then Confirm, gives each site back its previous mode.
After an emergency stop, must you switch each site back to Block mode by hand?
4.4 Spot the scanners
- Understand how kokiGUARD spots a scanner that triggers no rule.
- Choose between Off, Detection only and Ban.
- Recognize a "Scan" line in the logs.
A discreet scanner looks like a browser and requests simple paths, one after the other: no rule reacts. Its errors show what it is. On a shop, in October 2026, such a robot got thousands of 404 responses without a single detection. So HAProxy counts, for each address, the error responses that your sites send back to it. Above the threshold, the address shows in the logs and in the reputation, at most once every 10 minutes.
0Off
HAProxy counts nothing.
Only if these reports are of no use to you: without the counter, nothing is reported.
1Detection only
The address shows in the logs and the reputation, without ban points. This is the default setting.
To observe first, and always behind a CDN that does not pass on the visitor's address.
2Ban
The address gets the Scan (HTTP errors) points of the default ban profile: 60 by default, which gives a 10-minute ban from the first report, then 6 hours and 24 hours if the scan starts again.
When the "Scan" lines of the logs show only robots.
- Open Settings, Scanner detection card.
- Choose the Mode, then check the Threshold (errors per minute) (60 by default), the Status codes counted (
400,403,404,405,410,414) and the Paths not counted (/.well-known/). - Click Save scanner detection. The threshold and the choice between detection and ban take effect at once. Turning the detection on or off, the codes and the paths need an Apply.
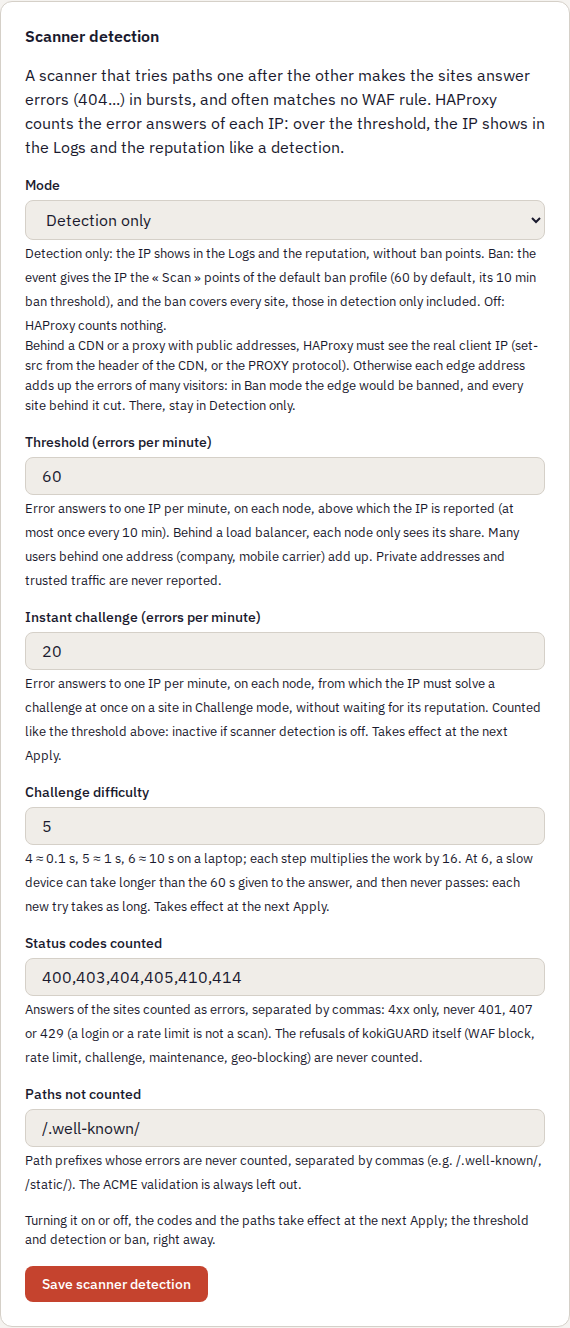
Scanner detection. The default settings. Each field has its help below it. The two challenge settings (chapter 4.5) are in the same card.
These are never counted: the refusals of kokiGUARD itself (block, rate limit, JavaScript challenge, maintenance, country blocking), the codes 401, 407 and 429, certificate validation, trusted traffic and private addresses.
What you should see
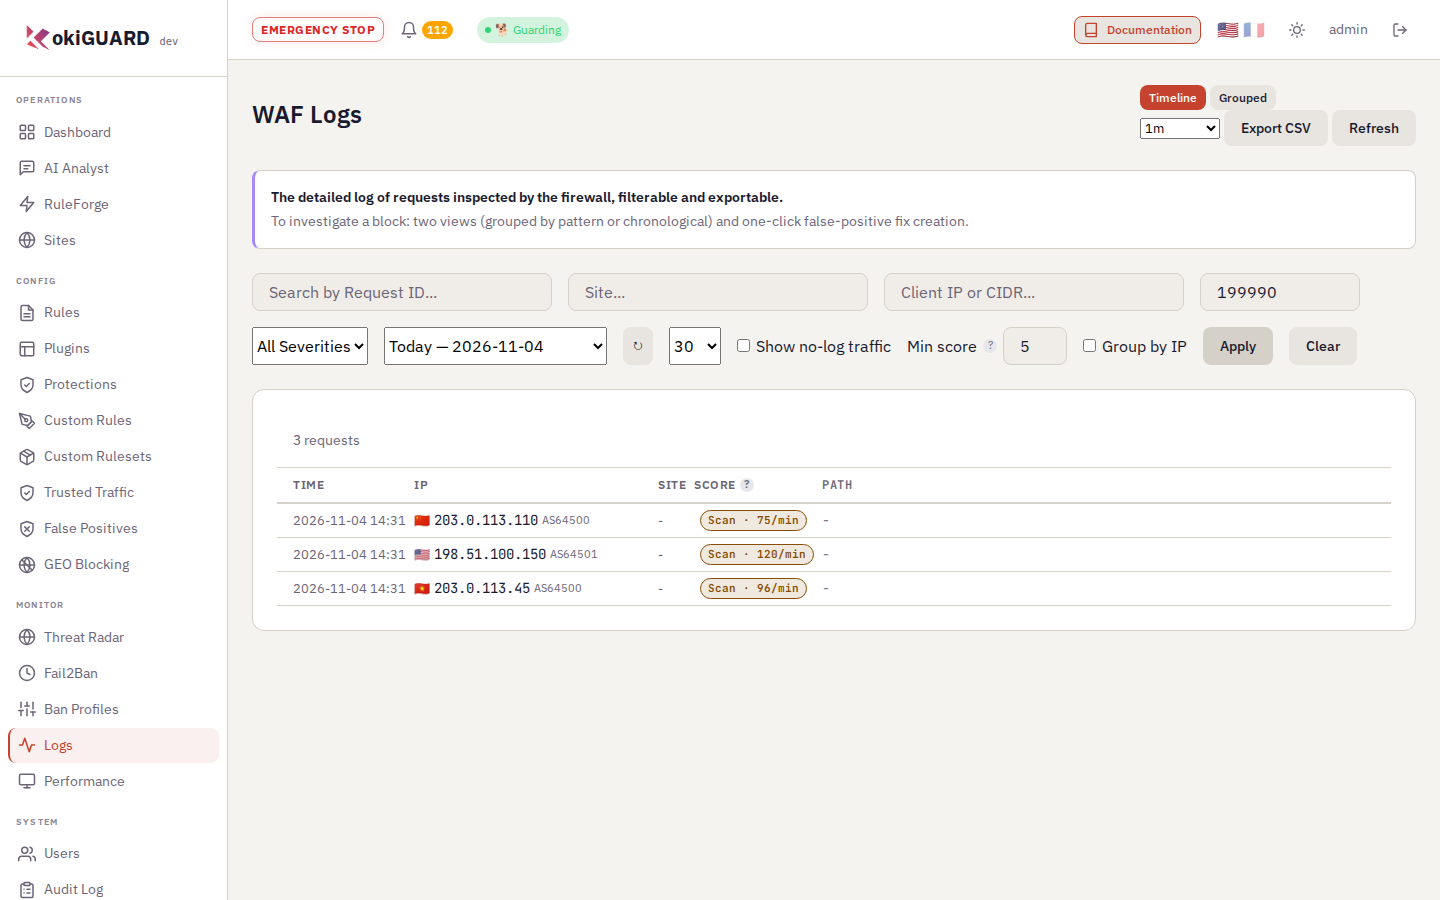
Scanners in the logs. A "Scan · N/min" line gives the number of errors per minute at the time of the report. It has no site, no path and no WAF score. Here, the list is filtered on rule ID 199990, the one of the scans.
You do not correct a "Scan" line like a false positive. For a legitimate source, for example a tool that checks your links, put its address in trusted traffic (chapter 3.2), or add the path it visits to the Paths not counted.
A scan has no site: only the default ban profile counts, and the ban applies to all your sites, also those in Detect mode. Behind a CDN or a proxy that does not pass on the visitor's address to HAProxy, each CDN address adds up the errors of many visitors: in Ban mode, it would be banned and all the sites behind it cut off. In that case, stay in Detection only, and ask Kokiris to have the visitor's address restored.
- The threshold applies per node. Visitors behind the same address (company, mobile operator) add up.
- Each Apply resets the counters to zero.
- The emergency stop also pauses scanner bans.
Your sites are behind a CDN that does not yet pass on the visitors' address to HAProxy. Which mode do you choose for scanner detection?
4.5 The challenge instead of the ban
- Understand what an address under challenge sees.
- Know when to prefer Challenge mode to Ban mode.
- Lift a challenge.
A ban cuts off the address for everyone, on all sites. That is too strong when several customers share the same address (a company, a mobile operator), or when you want to slow down a robot rather than cut it off. The Challenge mode of a site (chapter 2.1) then replaces the ban with a test that only a real browser can pass.
- The site blocks as in Block mode, and each block adds reputation points to the address, as in Ban mode.
- When the address reaches a threshold of the ban profile, it is not banned: for the duration of the jail (10 minutes, 6 hours or 24 hours), it must solve the challenge on the sites in Challenge mode.
- An address that causes too many errors (20 per minute by default, Instant challenge setting) gets the challenge at once, without waiting for its reputation. This counter is the counter of scanner detection (chapter 4.4): it works only if scanner detection is on.
The visitor's browser does a small calculation (a proof of work), and asks the visitor for nothing: usually less than one second. When the calculation is done, the visitor continues to browse. A script or a client without JavaScript stays blocked.

What the address under challenge sees. The default page shows in French or in English, depending on the browser. You can put your logo on it, or replace it with your own page (chapter 2.3).
These never get the challenge: an address that already solved it, a verified robot, trusted traffic, the kokiGUARD panel and certificate validation. An attack always gets the 403 page of the WAF.
- To switch a site to Challenge: site page, General card, Challenge card of the protection chain, then save and apply.
- To see the addresses concerned: Fail2Ban page, Reputation tab. An address under challenge has the badge challenge (10m), challenge (6h) or challenge (24h); the history records the challenge instead of the ban.
- To lift a challenge before its end: Lift challenge button in the reputation or in the IP details. Clearing the reputation does not lift it.
In Settings, Scanner detection card, an administrator also sets:
- Instant challenge (errors per minute): 20 by default;
- Challenge difficulty: 5 by default, from 3 to 6. Each step multiplies the calculation by 16: about 0.1 s at 4, 1 s at 5, 10 s at 6 on a laptop. At 6, a slow device may never pass.
These two settings take effect at the next Apply.
The calculation costs an equipped attacker as much as a visitor: it stops simple scripts and clients without JavaScript, not a person who solves it on purpose. Against a determined attack, stay in Ban mode. On a shared platform, Challenge mode is reserved for the hosting provider, because it feeds the shared reputation.
The JS Challenge of chapter 3.3 applies to all visitors, on the paths that you list. The challenge of Challenge mode targets only the addresses that collected blocks or errors, on the whole site.
Your shop gets many customers behind the same company proxy, and an insistent robot goes through it too. Which mode limits the damage?
- Understand the reputation of an address and the four jails.
- Ban and unban by hand, and adapt a ban profile.
- Find an IP and read its details in Fail2Ban.
- Spot a campaign on the Threat Radar, by country or by network (AS), and ban the blocks of a network.
- Use the emergency stop and return to normal.
- Spot scanners by their errors, and choose between detection and ban.
- Send a challenge instead of a ban, and lift it.