Level 2 · Protect
You enable the WAF on a site, you apply the configuration, then you use a canary rule to check that a rule is really active. The examples use a WordPress site. During the training phase, Kokiris makes these settings for you: this level teaches you to understand them and to make them again.
2.1 Enable the WAF and choose a mode
- Enable the WAF on a site.
- Choose between Detect, Block, Challenge and Ban.
1Detect
The WAF analyzes and logs everything, but it blocks nothing.
The mode of the training phase: you find the false positives and the visitors are not disturbed.
2Block
The requests whose score reaches the threshold get a 403 page.
At the end of the training, when Kokiris has confirmed that the logs are clean.
3Challenge
Blocks like Block, and adds reputation points to the IP. At the threshold of the profile, the IP must solve a challenge in its browser instead of being banned.
When a ban would be too harsh: customers behind the same address, robots that you want to slow down without cutting off humans (chapter 4.5).
4Ban
Blocks, and adds reputation points to the IP. Above a threshold, Fail2Ban bans the IP.
Later, on a stable site, with the agreement of Kokiris.
Detect is the camera that films and does nothing. Block is the guard who refuses entry. Challenge is the guard who, after many refusals, asks the persistent visitor to prove that they mean no harm before they come back. Ban is the guard who refuses entry and remembers the face: next time, the door stays closed for some time.
- In Sites, click ✏️ Edit on the row of the site.
- In the General card, Protection Pipeline section, check WAF Enabled.
- Select Detect, then click Save Changes at the bottom of the page. The four modes form a chain: the card of the selected mode and the cards that it includes show in color.
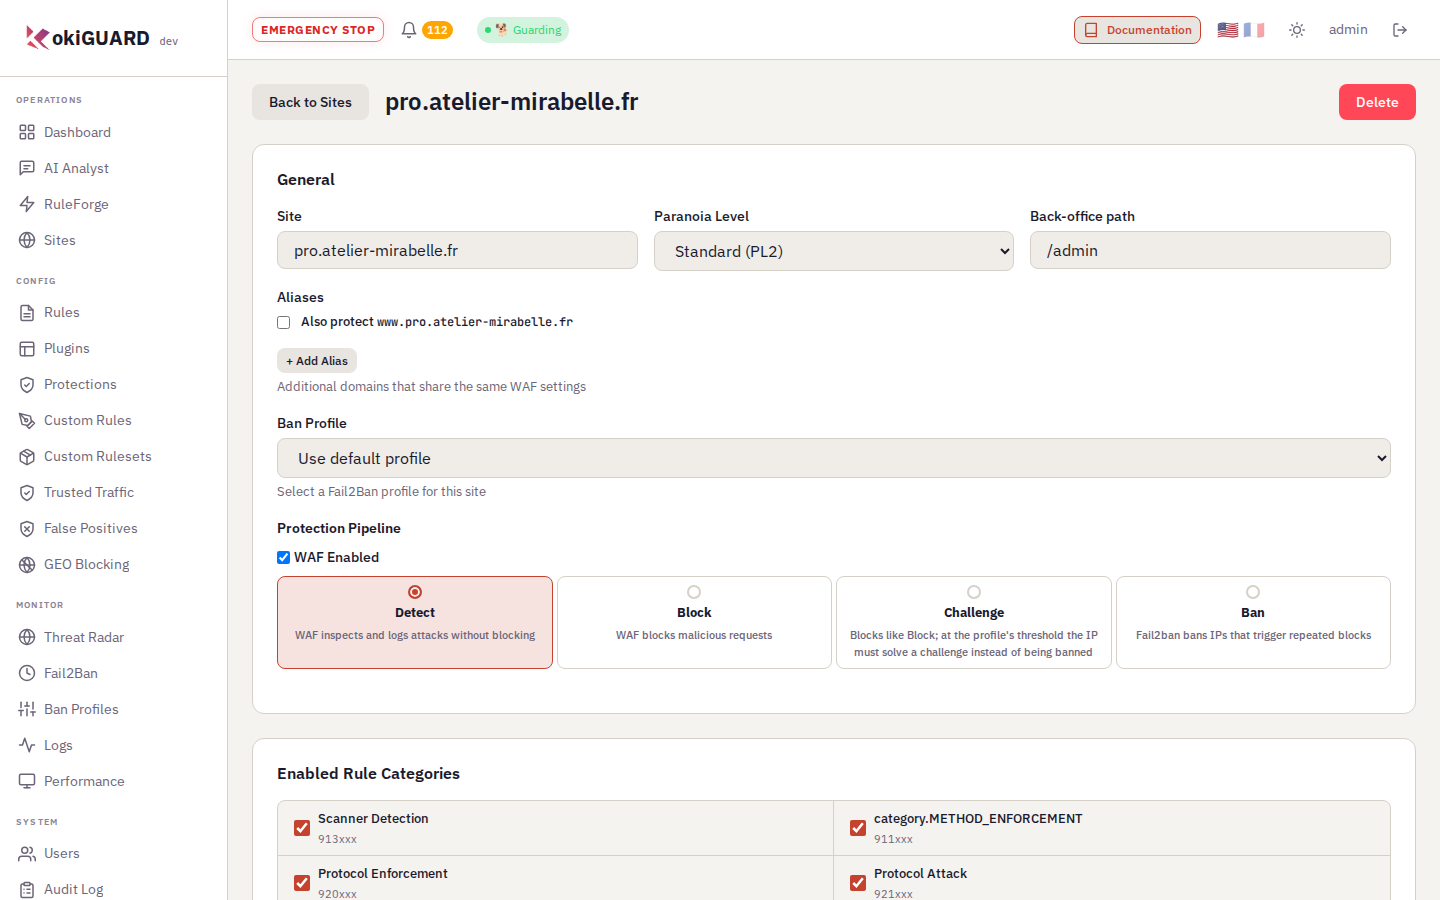
The site page. WAF enabled, Detect mode. Check the Also protect box under Aliases to give the www. alias the same settings. The Back-office path field is only for PrestaShop and Magento shops (chapter 5.1).
The site is saved, but the WAF does not apply it yet. The next chapter tells you how to apply it.
With a reseller or member account (chapter 5.5), the Challenge and Ban cards are greyed out, with the message "Shared ban protection, run by your hosting provider": a ban applies to all the sites of the platform, so only the hosting provider controls it. A site that you create starts in Block, and a site that is already in Ban stays in Ban.
You put a new site online today. Which mode do you select first?
2.2 Apply a change
- Understand why a change is not active immediately.
- Apply, then go back if necessary.
kokiGUARD first saves each change as "pending". Thus you can prepare several changes and apply them all at once, at the time that you choose.
- Find the banner at the top of the screen: Apply Changes, Discard and the view link.
- Click view to read the list of changes again in Revisions.
- Click Apply Changes.
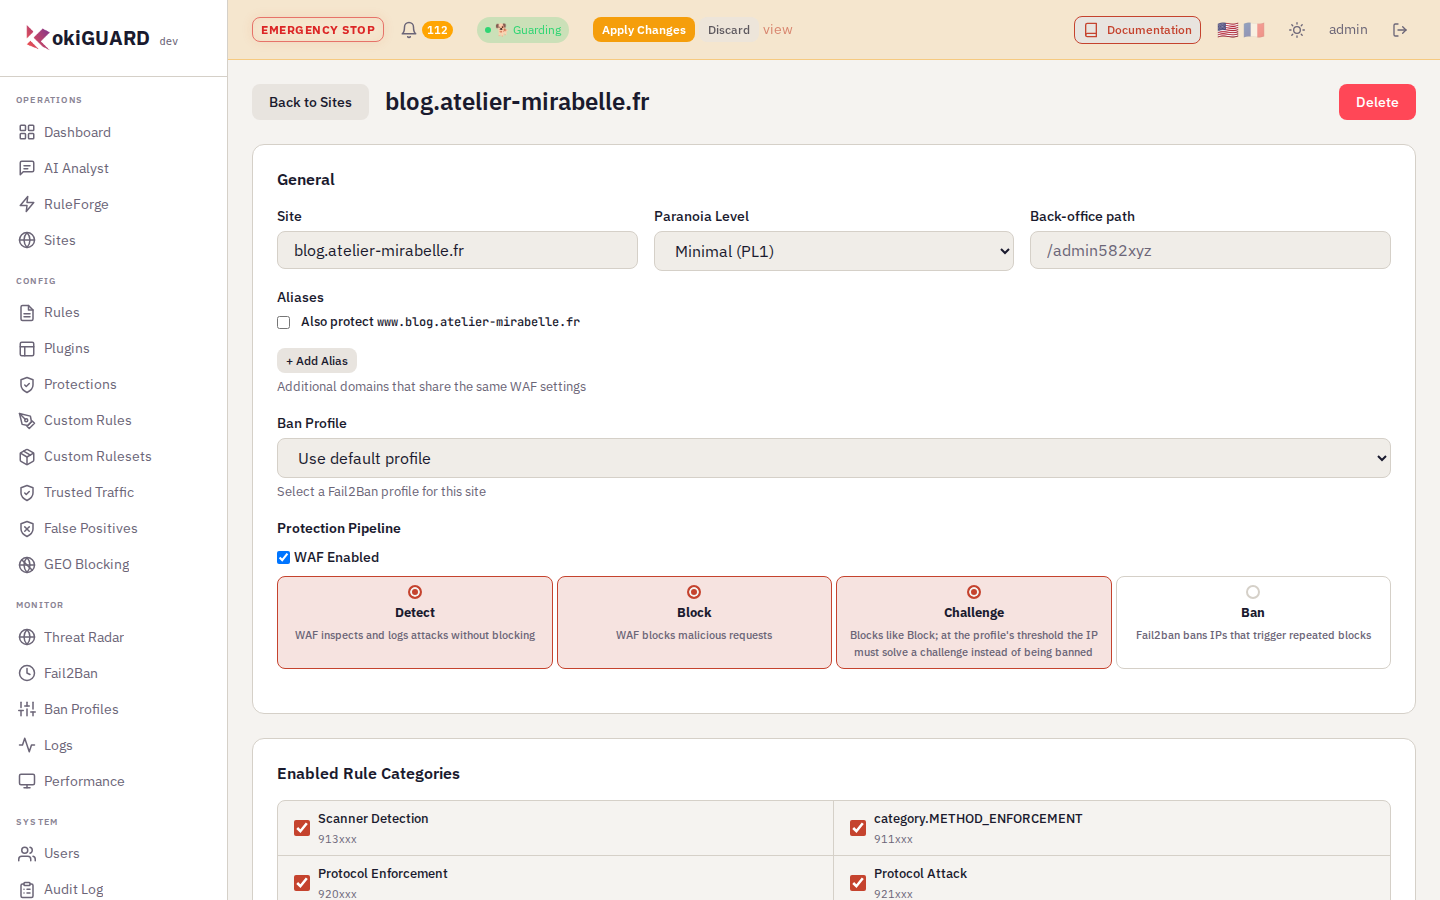
Changes are waiting. The banner stays visible until you apply or discard the changes.
What happens when you click Apply Changes
- kokiGUARD builds a new revision of the configuration and validates it offline.
- It takes a snapshot of the configuration in service.
- It installs the new configuration, restarts Coraza, then reloads HAProxy without cutting the connections.
- If this fails, it automatically puts the snapshot back. The failure message gives the revision that it put back.
- The other nodes of the cluster get the same revision.
The Apply Changes button shows only for an account that has the right to apply (editor role, or Revisions and apply row checked for write). Without this right, your changes wait until an editor or Kokiris applies them.
Automatic apply
If the option Apply the pending changes automatically is checked (Settings, System Actions card, administrator), you do not need to click:
- the leader applies the changes itself when the pending changes have not changed for 90 seconds, and at the latest 5 minutes after the first one. Thus a series of changes causes only one reload;
- it uses the same checks as Apply Changes: validation, snapshot, restore if it fails;
- the banner becomes "Pending changes — applied automatically", with the time of the last Apply;
- a failure shows in a banner for the accounts that can apply, and goes to the audit log. kokiGUARD makes no new attempt before your next change.
A reseller or member account never has the Apply Changes button: on a shared platform, the hosting provider turns on automatic apply, and these accounts see "applied automatically" in its place.
An Apply empties the HAProxy counters: rate limits, queue, scanner detection. The 90-second wait groups your changes to prevent many reloads in a short time.
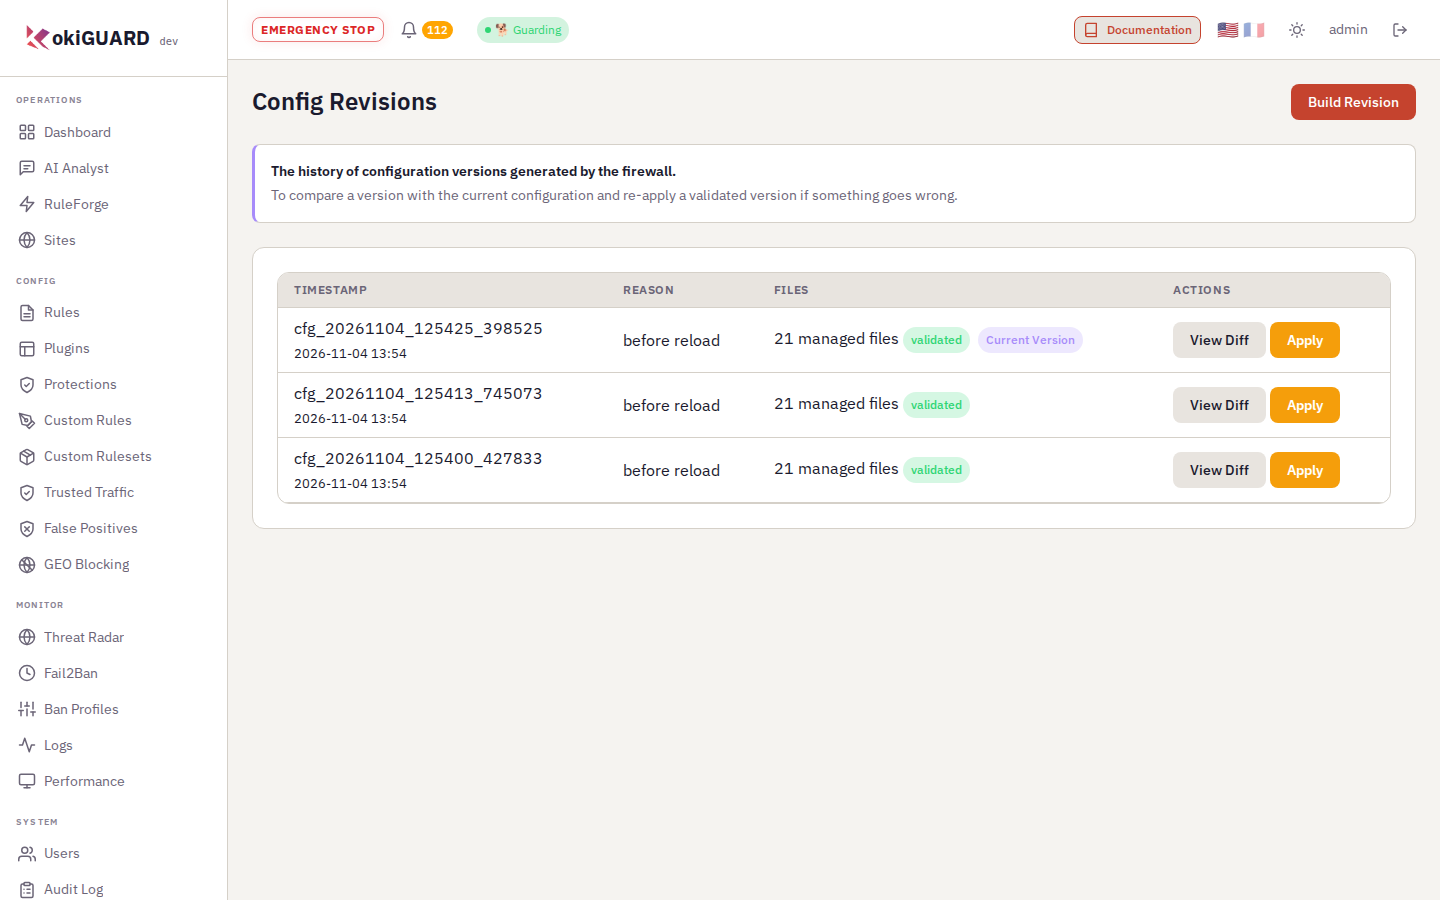
Revisions. Each apply leaves a validated revision, which you can compare or apply again.
- Saving prepares. Applying puts into service.
- A failed apply repairs itself: kokiGUARD restores the previous snapshot.
You saved three changes on three different sites. How many times must you click "Apply Changes"?
2.3 Check with a canary rule
- Create a harmless custom rule.
- Prove with curl that a rule is inactive, then active.
- Recognize a response that kokiGUARD blocked.
A canary rule blocks a request that nobody sends by chance. Thus it disturbs no visitor, and it gives you a reliable test that you can run again after each change.
It is the alert siren that is tested on the first Wednesday of the month at noon: you check that the alarm works, and there is no fire.
- Open Custom Rules, then click + Add Rule.
- Fill in: Rule Name kokiGUARD canary rule, Site your site, Variables
ARGS:kokiguard-test, Operator@streq, Operator Valuebloque-moi, Actionsdeny, Severity Critical. - Click Save. Do not apply yet.
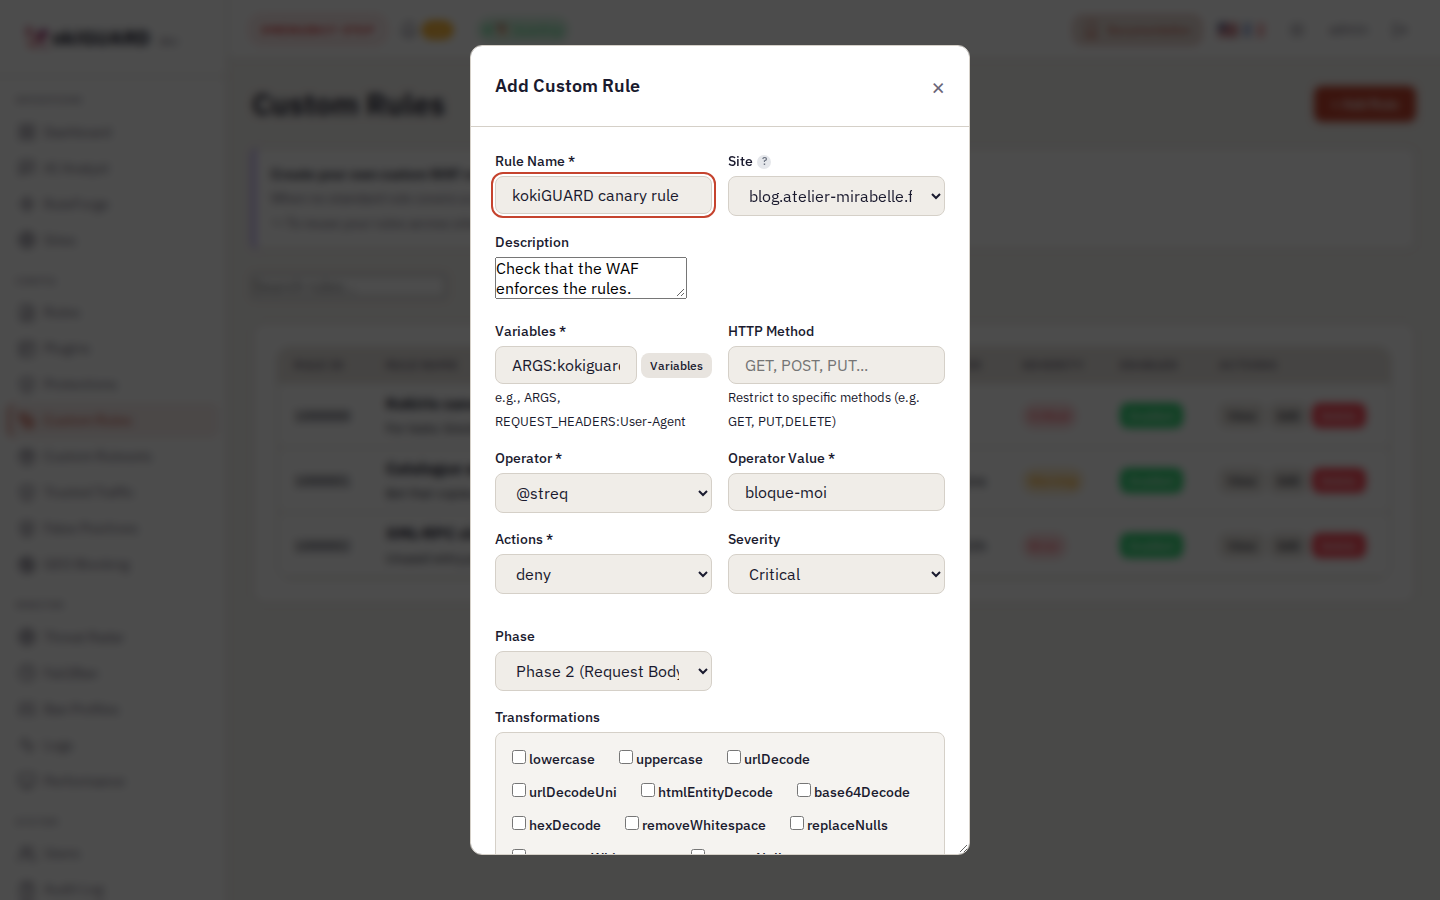
The canary rule. It refuses each request whose kokiguard-test parameter is exactly bloque-moi.
Test 1: rule saved but not applied
curl -s -o /dev/null -w '%{http_code}\n' 'https://www.votre-site.fr/?kokiguard-test=bloque-moi'
200
Replace www.votre-site.fr with the address of your site. The request passes: the rule exists in the panel, but not yet in the WAF.
Test 2: after "Apply Changes"
curl -s -D - -o /dev/null 'https://www.votre-site.fr/?kokiguard-test=bloque-moi'
HTTP/2 403
x-waf-action: blocked
cache-control: no-cache
content-length: 3157
content-type: text/html; charset=UTF-8
alt-svc: h3=":443"; ma=60
Two signs prove that kokiGUARD blocks the request: the 403 code and the x-waf-action: blocked header.
Test 3: a normal request still passes
curl -s -o /dev/null -w '%{http_code}\n' 'https://www.votre-site.fr/?kokiguard-test=bonjour'
200
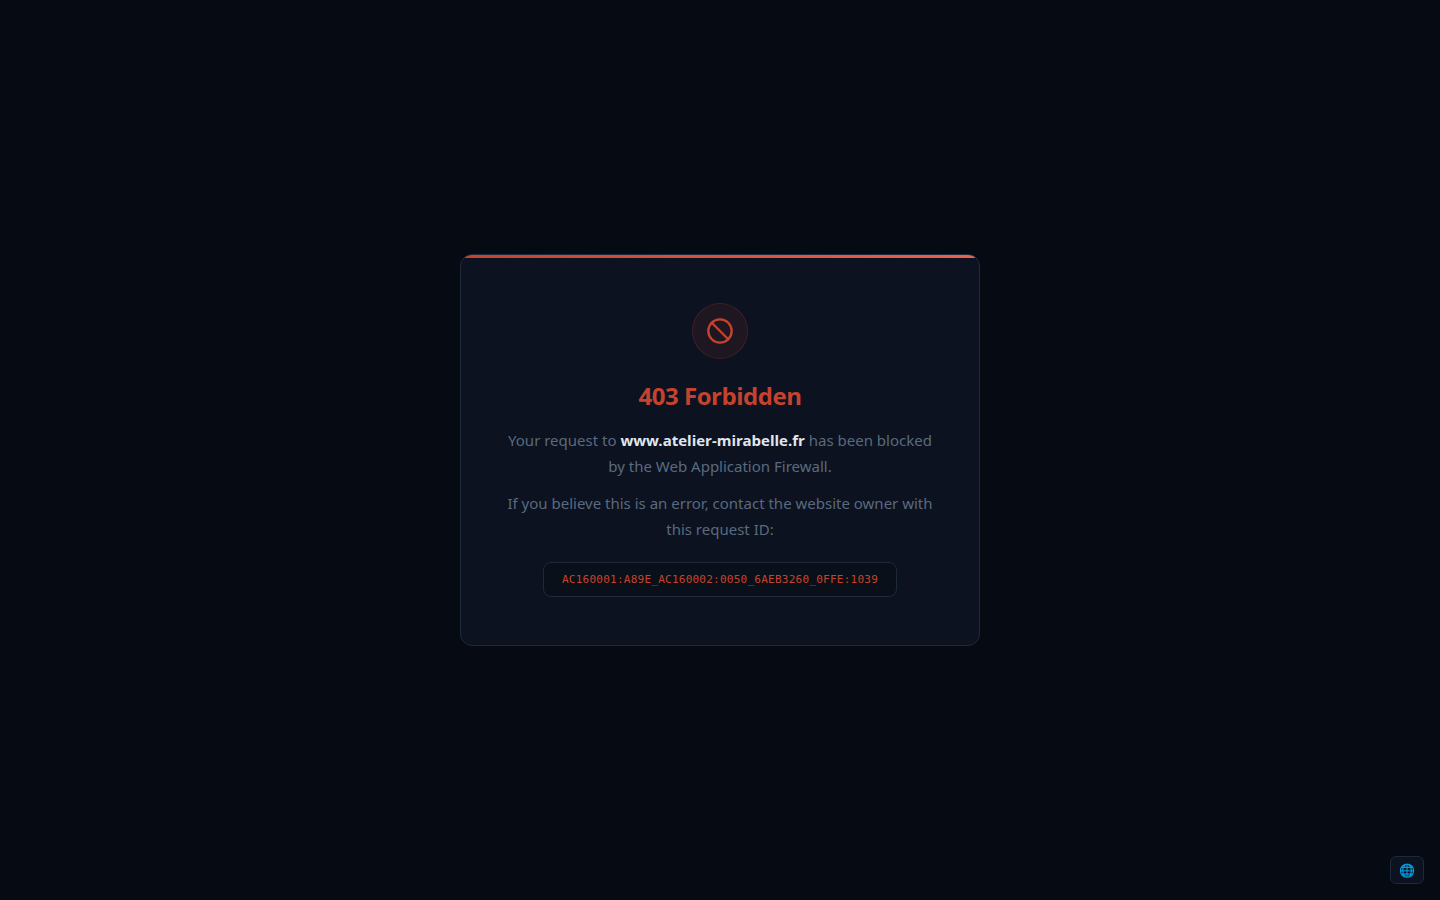
What a blocked visitor sees. A 403 page in French or in English (🌐 button at the bottom right), with the name of the site and a request ID to give to the support team. The same ID is in the X-Request-ID header, in the kokiGUARD logs and in the HAProxy logs.
In Settings, Error Pages card, the ⬆️ Upload button replaces the WAF Blocked (403), Rate Limited (429), WAF Error (500) or Proof-of-work challenge page with your HTML file, of 14 KB at most (editor role). An upload, like a reset, creates a pending change: kokiGUARD serves the new page after Apply Changes. Write %% for each % of the page, in the text and in the CSS (width: 100%%): if you write a single %, kokiGUARD refuses the file. To show the site name and the request ID, copy %[var(txn.host)] and %[var(txn.coraza.id)] from the default page. 📄 Preview shows the final result, and 🔄 Reset to default puts back the original page. A kokiGUARD update never replaces a page that you customized.
Under the list, Challenge page logo puts your logo (SVG, PNG or WebP of 12 KB at most) on the default challenge page (chapter 4.5). It shows after Apply Changes.
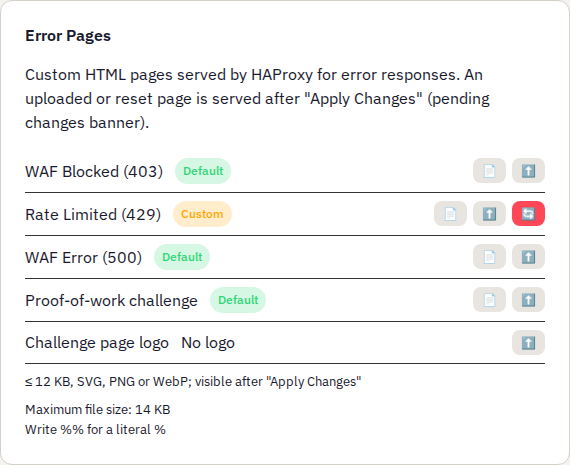
Error pages. The four pages that kokiGUARD serves by default. After an upload, the badge changes and the 🔄 Reset to default button shows.
The deny action blocks immediately, without the anomaly score. Use it only for sure cases, like this canary rule. The CRS rules obey the mode of the site.
You just saved a rule and curl still returns 200. What is the most probable cause?
2.4 Read the logs
- Find a blocked request.
- Read an anomaly score and the outcome of a request.
- Open the radiography of a request.
The Logs page shows each inspected request, on all the nodes of the cluster. In Detect mode, this is where you see what would have been blocked.
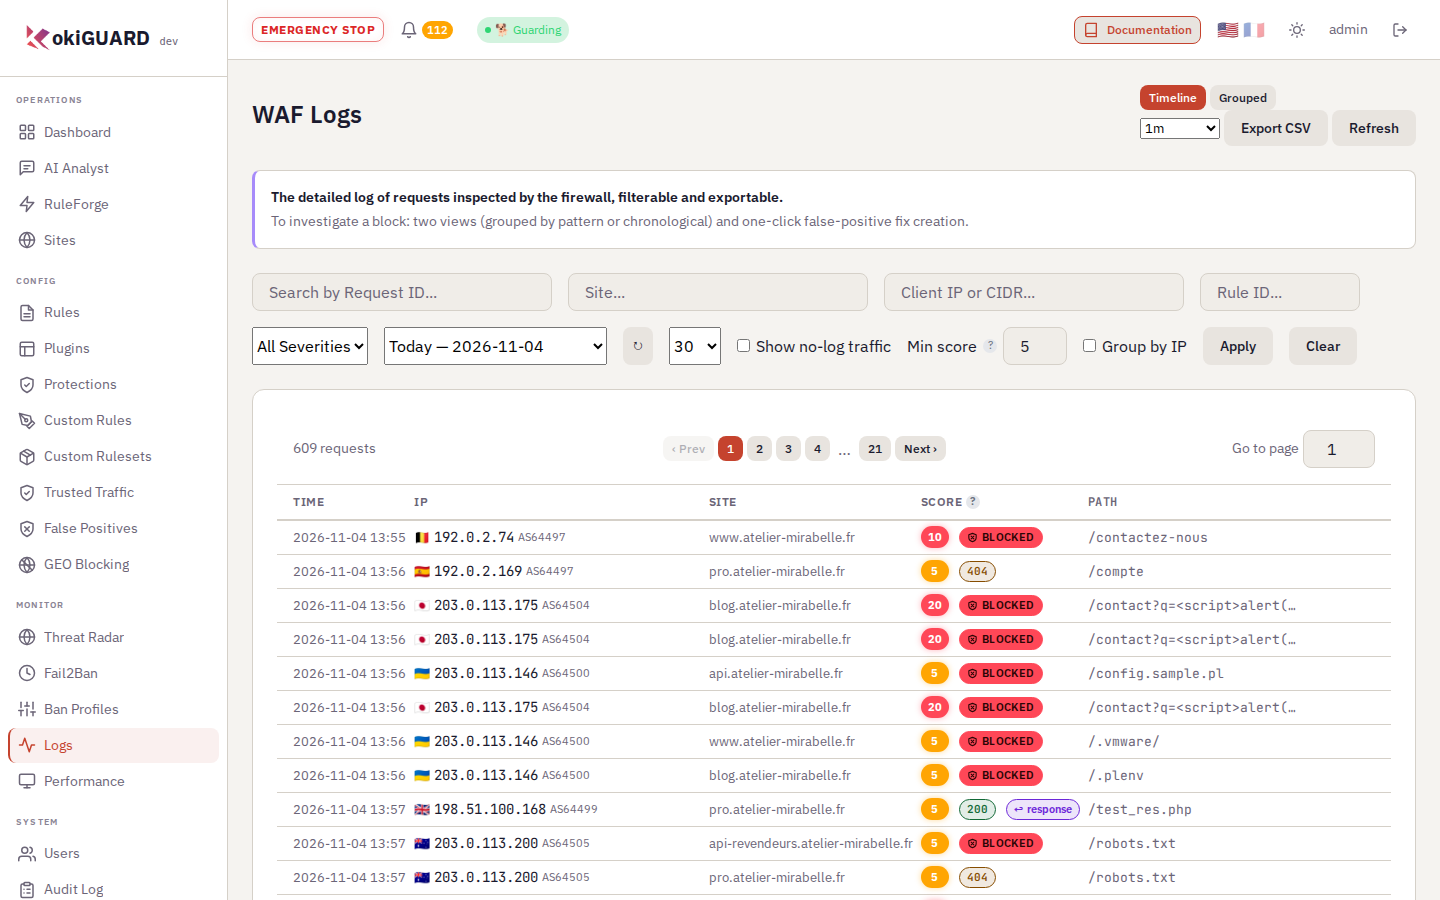
WAF Logs. Robots look for sensitive files (/proc/self, /composer.lock) or try injections. On the trade area, in Detect mode, the outcome is the code that the site returned (here 404): the WAF did not block the request.
Read the score and the outcome
Each rule that reacts adds points according to its severity: critical 5, error 4, warning 3, notice 2. When the total reaches the threshold of the site (5 by default), the request is blocked in Block or Ban mode.
Some rules of the Kokiris rule sets are detection only: they report a suspicious request, but they never block it. They give 0 points, for the score and for the ban: their line shows in the logs with a score of 0.
A check at the airport: each suspicious sign adds points. At 5 points, the officer opens the suitcase. In Detect mode, the officer writes a note and lets you go; in Block mode, the officer does not let you go.
Next to the score, a pill shows what really happened to the request. The dashboard shows the same pill.
| Pill | Meaning |
|---|---|
| BLOCKED | kokiGUARD blocked the request: it did not reach the site. |
An HTTP code: 200, 302, 404… | The request passed, and the site returned this code. This is what you see in Detect mode. |
| passed | The request passed, but its HTTP code is no longer known. |
| ↩ response | A rule reacted to the response of the site, for example an error page that tells too much, and not to the request of the visitor. |
| Body too large · refused (413) | The request body was larger than the size that kokiGUARD inspects: kokiGUARD refused it. Also " · passed" or " · upload" when kokiGUARD let it through (chapter 3.3). No score: this is not an attack. |
Next to each IP address, a badge shows its AS: the network that announces the address on the Internet, for example a hosting company, a mobile operator or a cloud provider. When you click the badge, this network opens in the threat radar (chapter 4.2).
- Filter on your site and your IP to find your tests.
- Go to the Grouped view to see the repeated patterns, or stay in Timeline to see each request.
- Click a row to see the triggered rules and their points, then click 🔍 Details: the Log Details window shows the rule, the side (request or response) and the headers.
- To find a specific request, paste the ID shown on the block page into Search by Request ID (see What if…).
The radiography of a request
For a recent request, the 🔬 Radiography button of the Log Details window collects on one screen all that kokiGUARD knows about the request:
- the outcome: BLOCKED or PASSED, with the HTTP code of the site when it is known, the name of the site and its mode;
- the anomaly score against the threshold of the site. In Detect mode, a line tells you when the request would have been blocked in blocking mode;
- the rebuilt request: each field that made a rule react has the number of this rule, and the fragment in question is highlighted when it is in the value as is. Cookies show only by their name and their length, never by their value;
- What triggered: each rule, with its field, its fragment and its side (request or response);
- This field over 24 h: the number of detections, the number of distinct IPs, and the share of the most active IP. With this, you see if the field disturbs many visitors or only one source;
- Active corrections: the correction that already covers this field, if there is one.
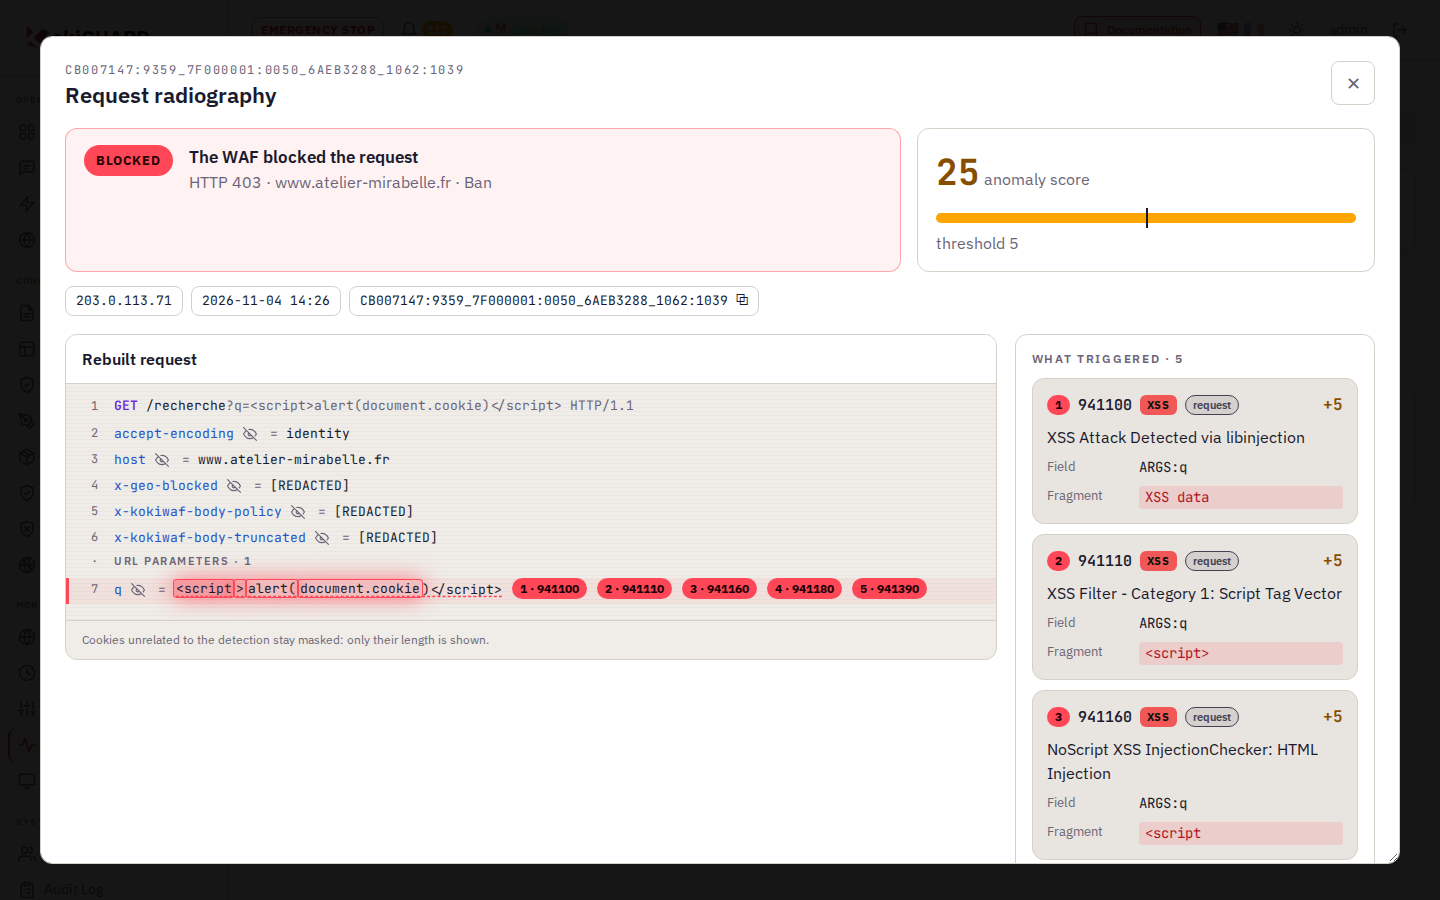
Radiography of a blocked request. The field in question has the number of the rule that reacted, and the fragment is highlighted. The 24 h statistics tell you if this field disturbs many visitors or only one source.
If the request is legitimate, Fix this false positive opens the correction form. The form is already filled in with the field in question and the rules that reacted on it (chapter 3.1).
- The logs are your source of truth, especially in Detect mode.
- Score ≥ site threshold = blocked request (except in Detect mode). The pill tells what really happened.
- The radiography shows the exact field and fragment that made the WAF react.
On a request, two warning rules (3 points each) reacted. The site is in Block mode, with the default threshold. What happens?
- Enable the WAF on a site and choose between Detect, Block, Challenge and Ban.
- Know the difference between saving and applying, go back with the revisions, and recognize automatic apply.
- Prove with a canary rule and curl that a rule is active.
- Read an anomaly score and the outcome of a request in the logs, then open its radiography.